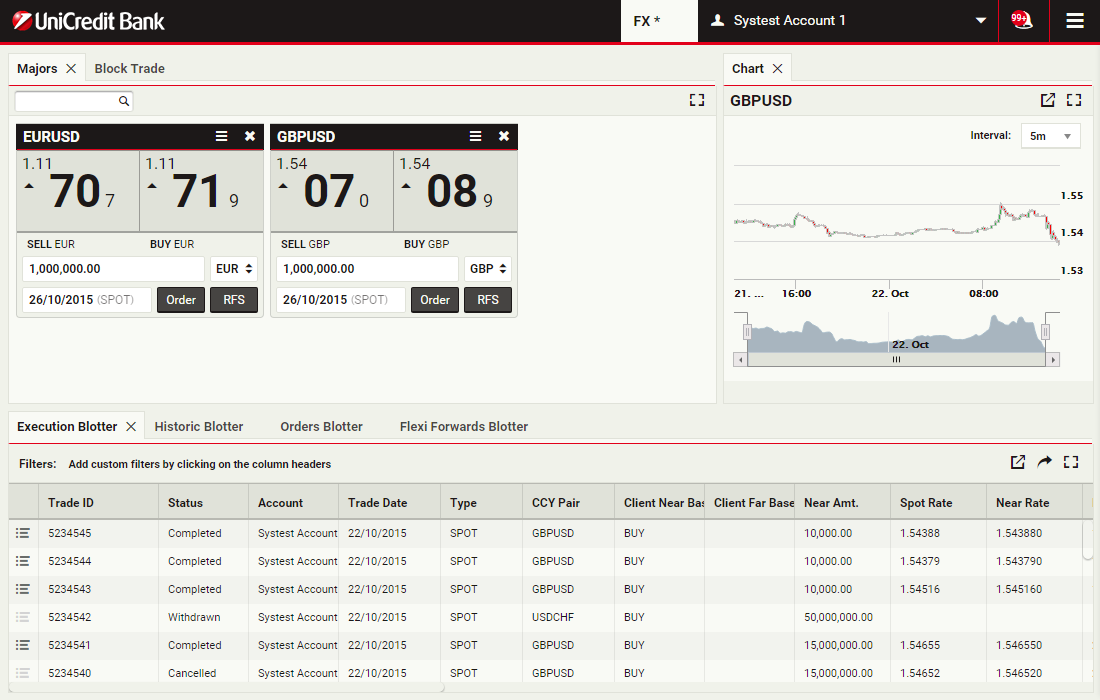


Customizing application layout
This is the default view of UCTrader. You can change its layout to suit your needs or create additional workspaces to group the information together. This section will show you how
ContinueCustomizing application layout
This is the default view of UCTrader. You can change its layout to suit your needs or create additional workspaces to group the information together. This section will show you how
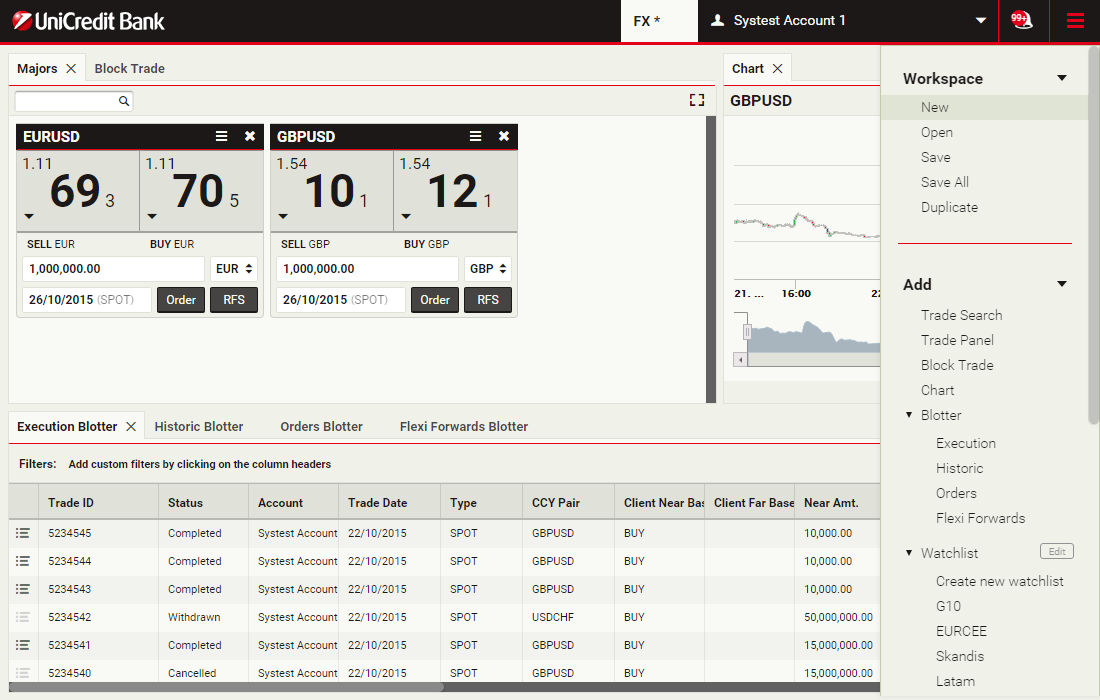
ContinueCreate a new workspace
To create a new workspace, choose Main Menu > Workspace > New
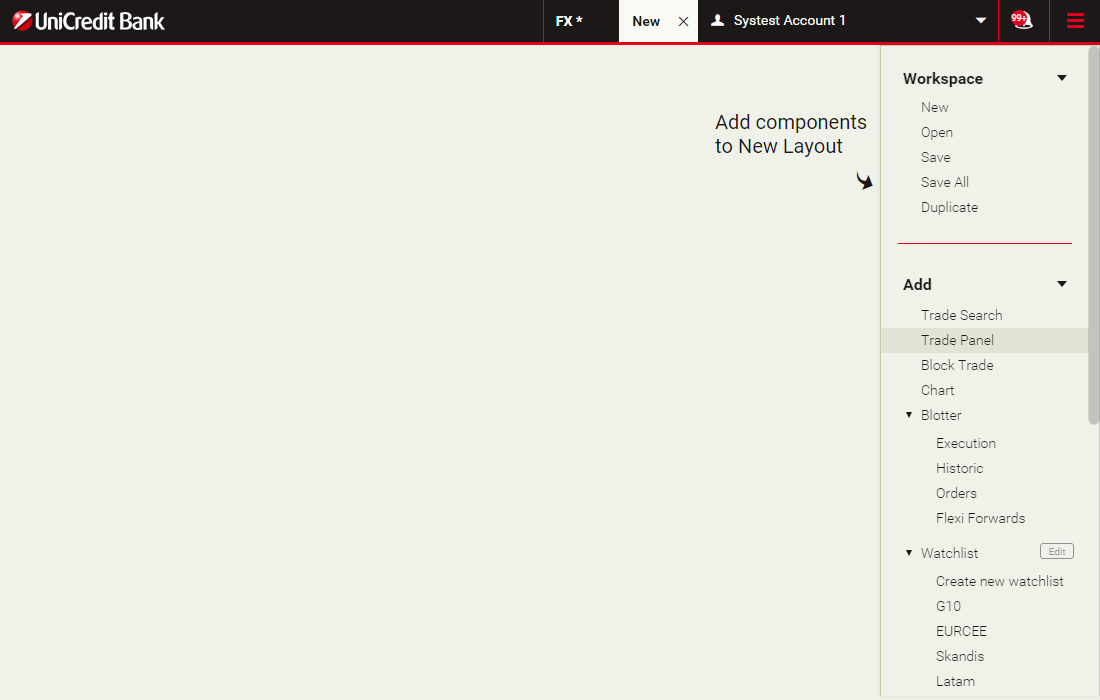
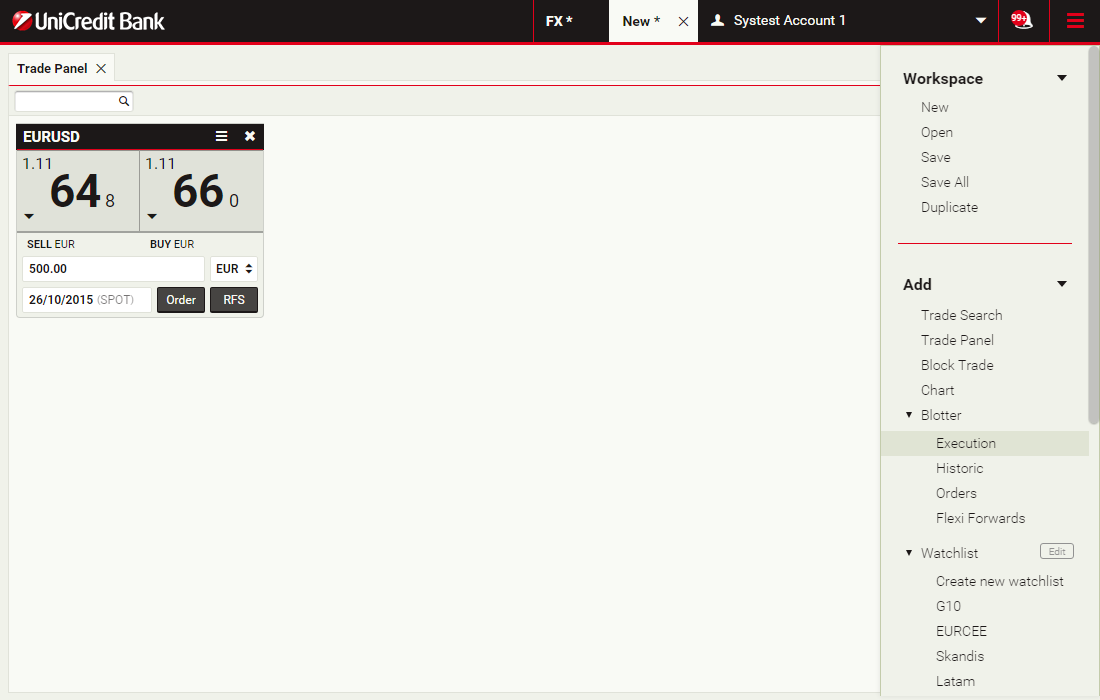
Add a trade panel
Trade panels contain trade tiles, which show prices and allow you to execute trades.
To add a trade panel, choose Main Menu > Add > Trade Panel
To add a trade panel, choose Main Menu > Add > Trade Panel
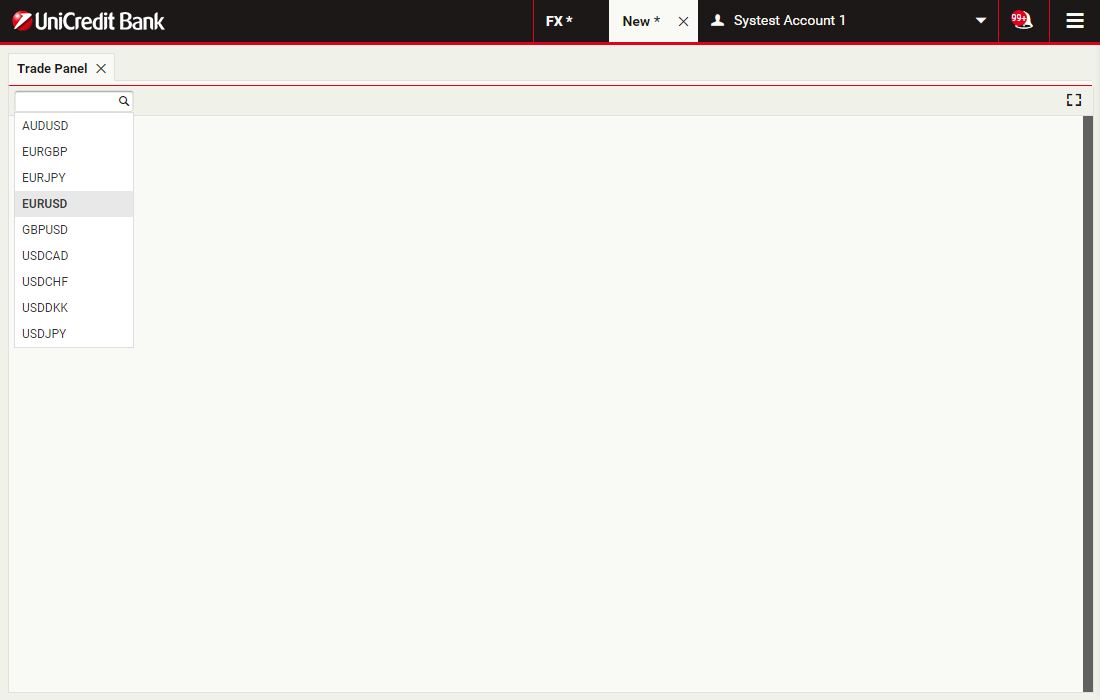
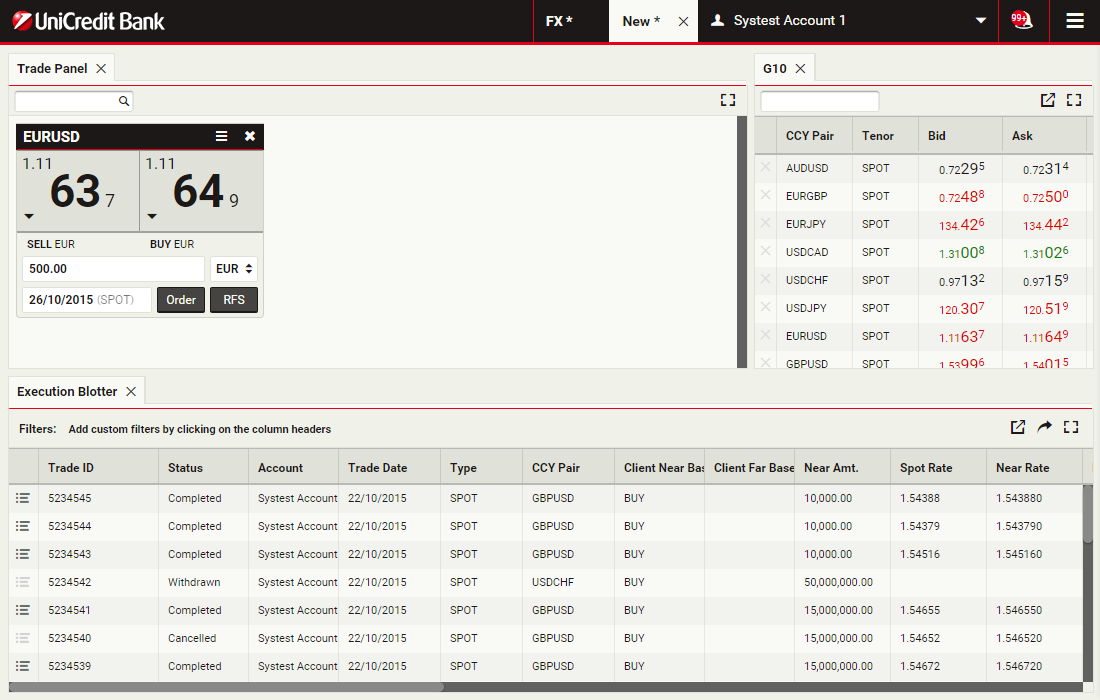
Add a trade tile
To add a trade tile to the trade panel, select a currency pair from the trade panel's currency-pair picker
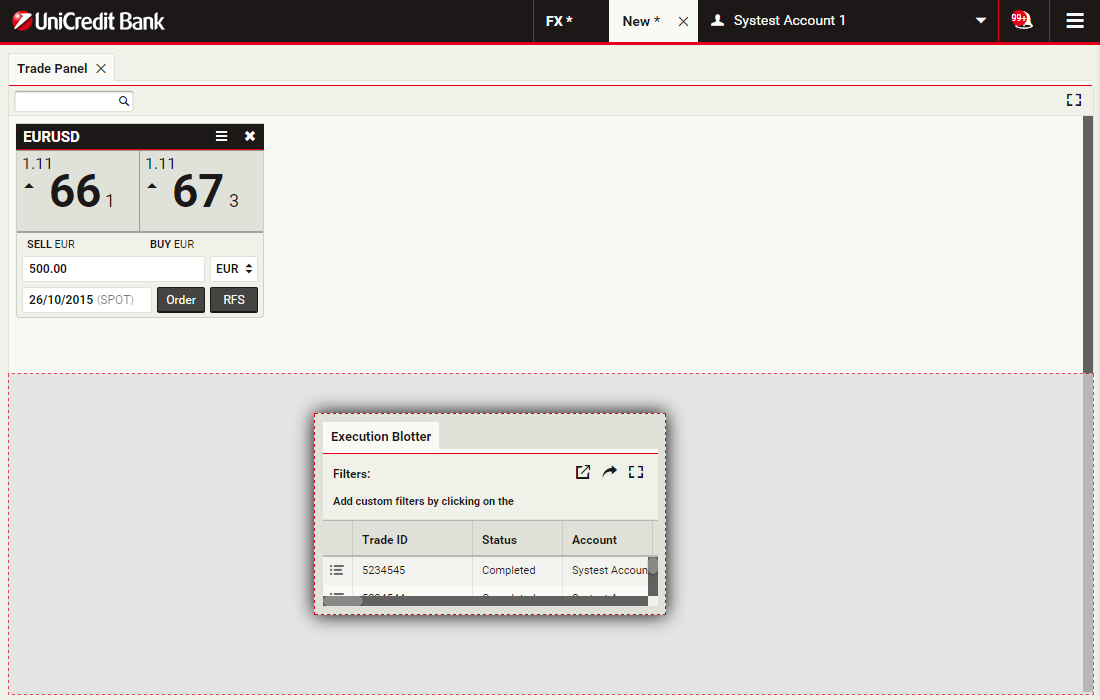
Add a blotter
Blotters show trading activity and allow you to manage orders.
Choose Main Menu > Add > Blotter > Execution
Choose Main Menu > Add > Blotter > Execution
Position the blotter
You can position the blotter in a convenient location on the workpace by dragging it across the screen.
Click the floating blotter to continue
Click the floating blotter to continue
Rename the workspace
You can rename your workspaces. Simply double-click the workspace tab and type a new name.
Click the workspace tab to continue
Click the workspace tab to continue
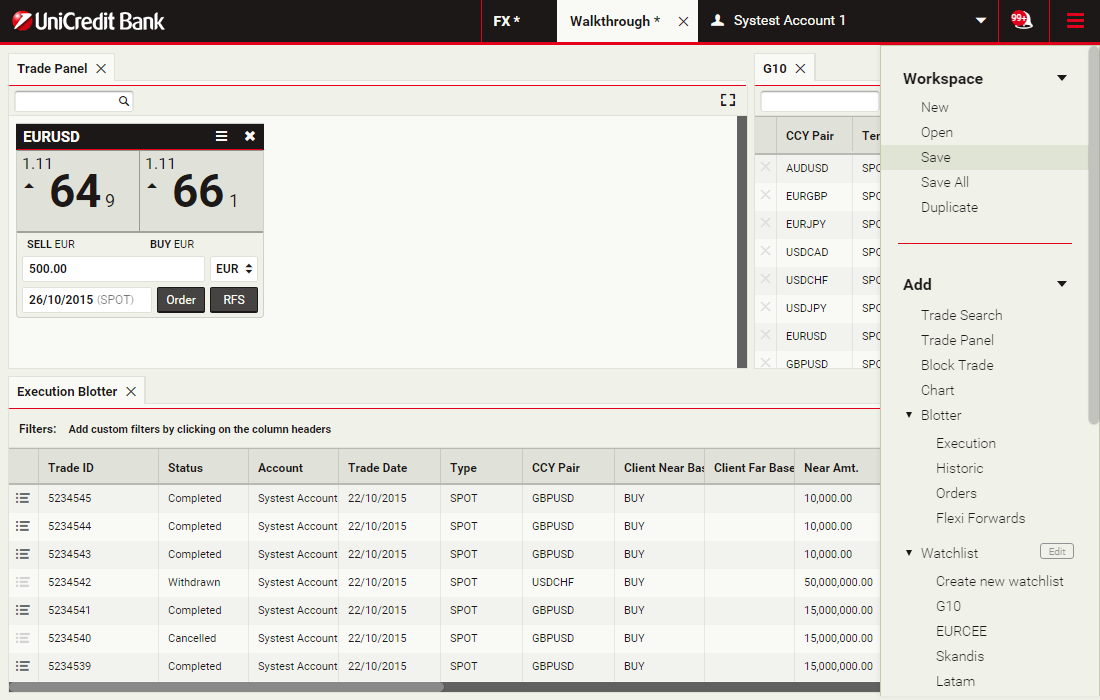
Save the workspace
To see the changes the next time you login, please remember to save them.
Choose Main Menu > Workspace > Save
Choose Main Menu > Workspace > Save
Trading FX with tiles
For the fastest possible execution, we offer one-click trading straight from the trading tile. Alternatively, we can offer double-click trading for added peace of mind. For more information or to request enablement of this feature, please contact your sales person
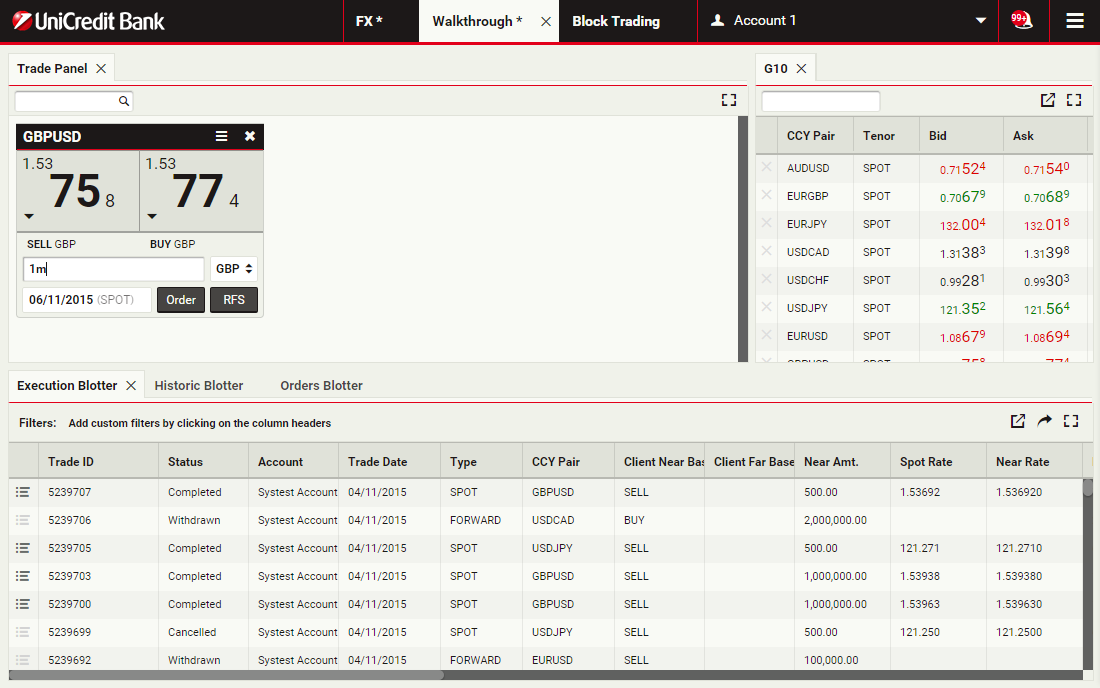
ContinueSpecify the currency amount
The Amount field accepts numeric input and shorthand units of 'k', 'm' and 'b' for thousand, million and billion respectively.
To specify one million, you can type '1000000' or '1m'.
Click the Amount field to continue
To specify one million, you can type '1000000' or '1m'.
Click the Amount field to continue
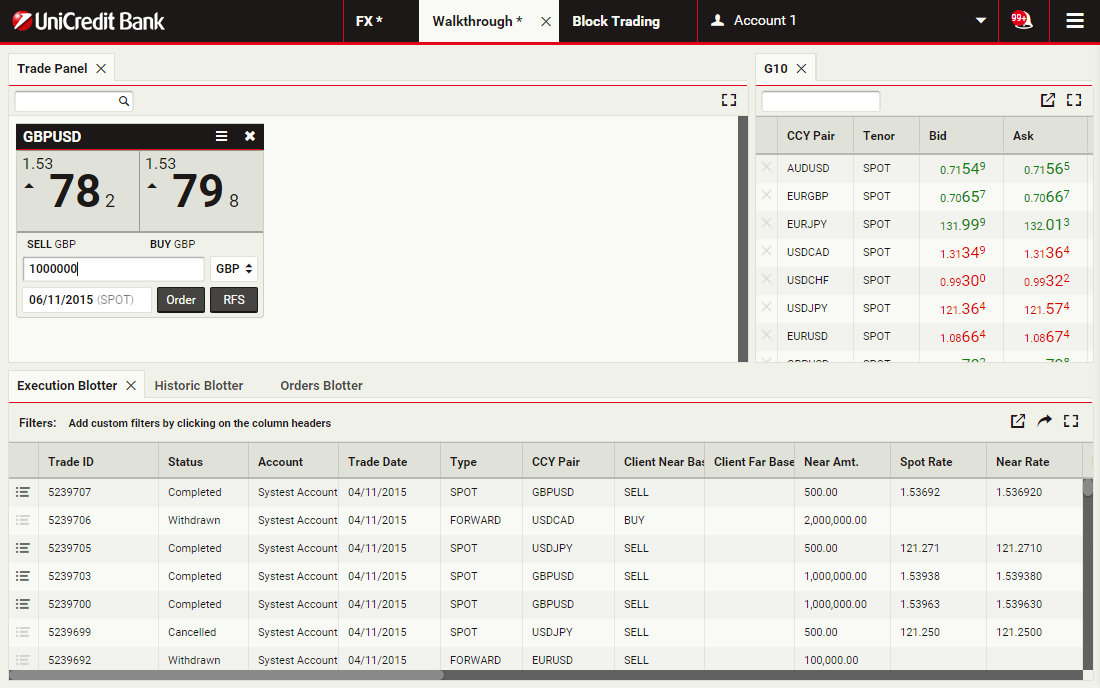
Select the dealt currency
Clicking the dealt currency field toggles between the base (GBP) and the counter (USD) currency of the tile's currency pair (GBPUSD).
To change the dealt currency from GBP to USD, click the dealt currency field
To change the dealt currency from GBP to USD, click the dealt currency field
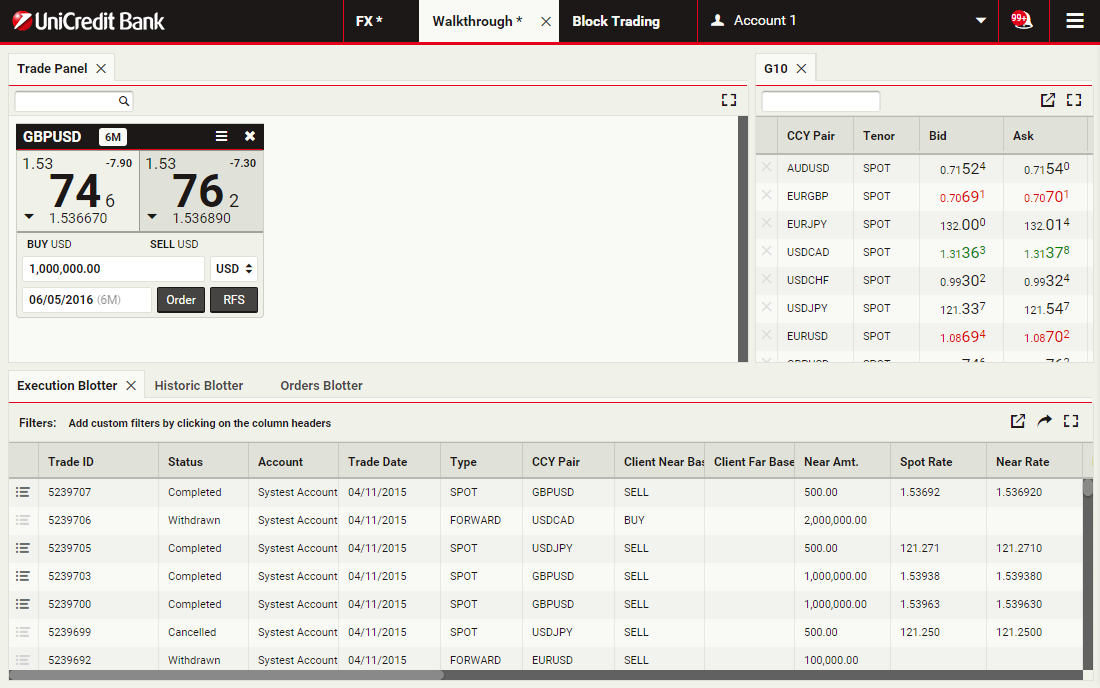
Select a value date
The default value date is spot. The date picker of the value date field provides a quick way to select tenors and broken dates.
To select a value date of six months forward, click the '6M' tenor
To select a value date of six months forward, click the '6M' tenor
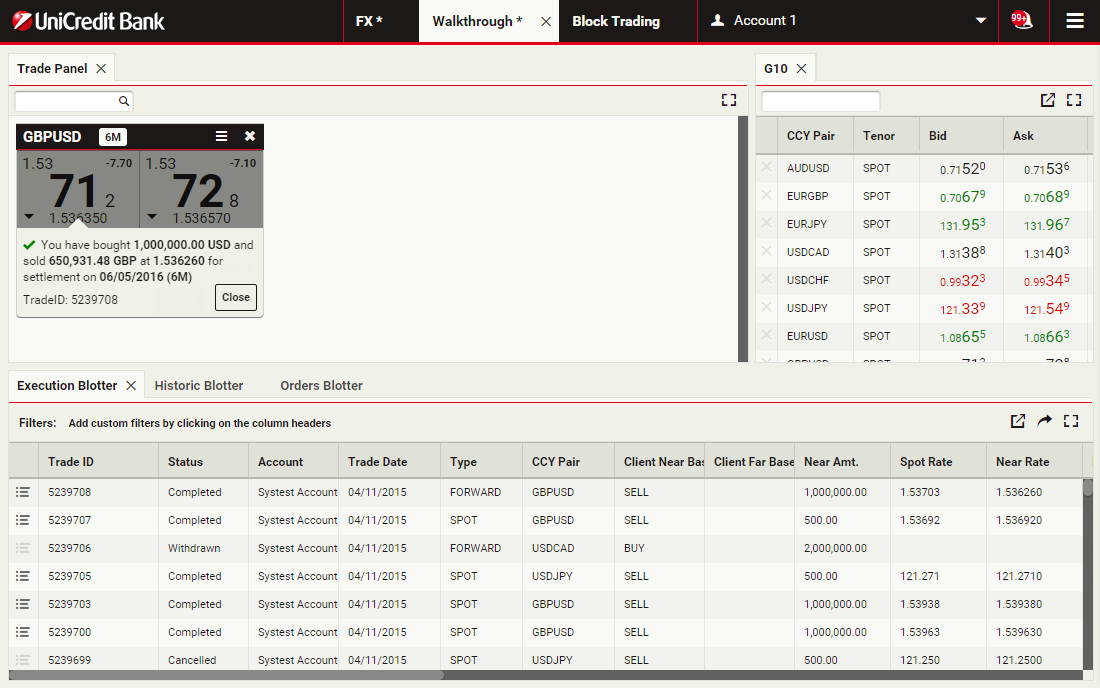
Execute the trade
You can see the forward points in the top-right corner and the all-in rate at the bottom of each rate. You can also see the trade direction in terms of the dealt currency for each rate.
To buy USD for GBP, click the left rate
To buy USD for GBP, click the left rate
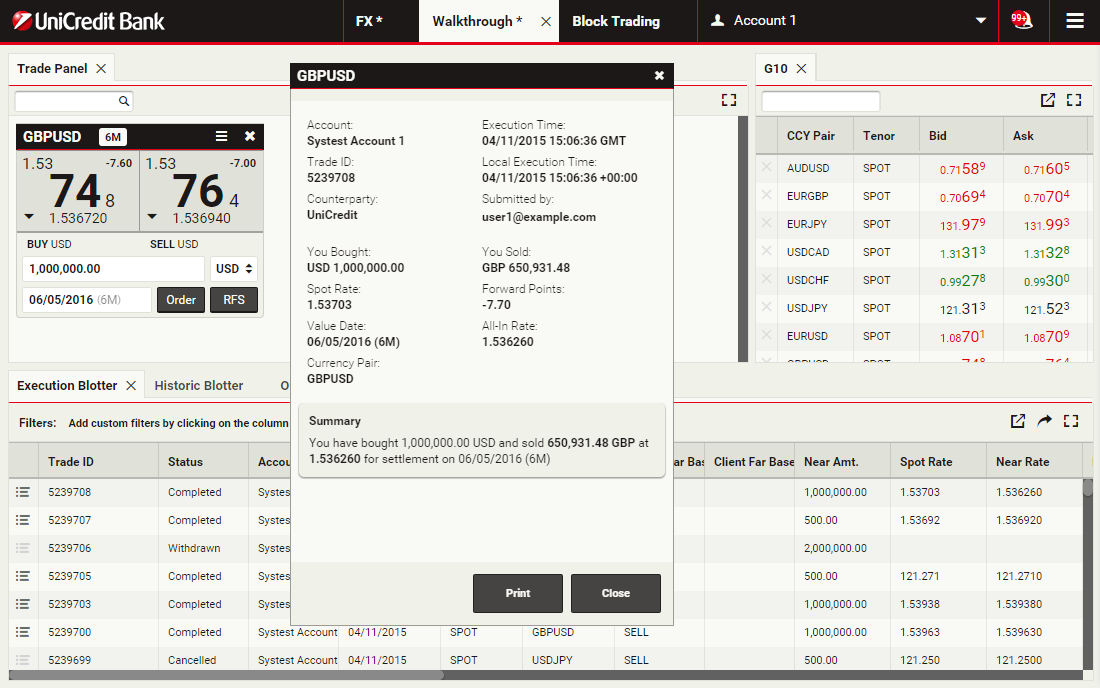
View the confirmation message
A confirmation message informs you that the trade was successful.
Click the Close button to dismiss the message
Click the Close button to dismiss the message
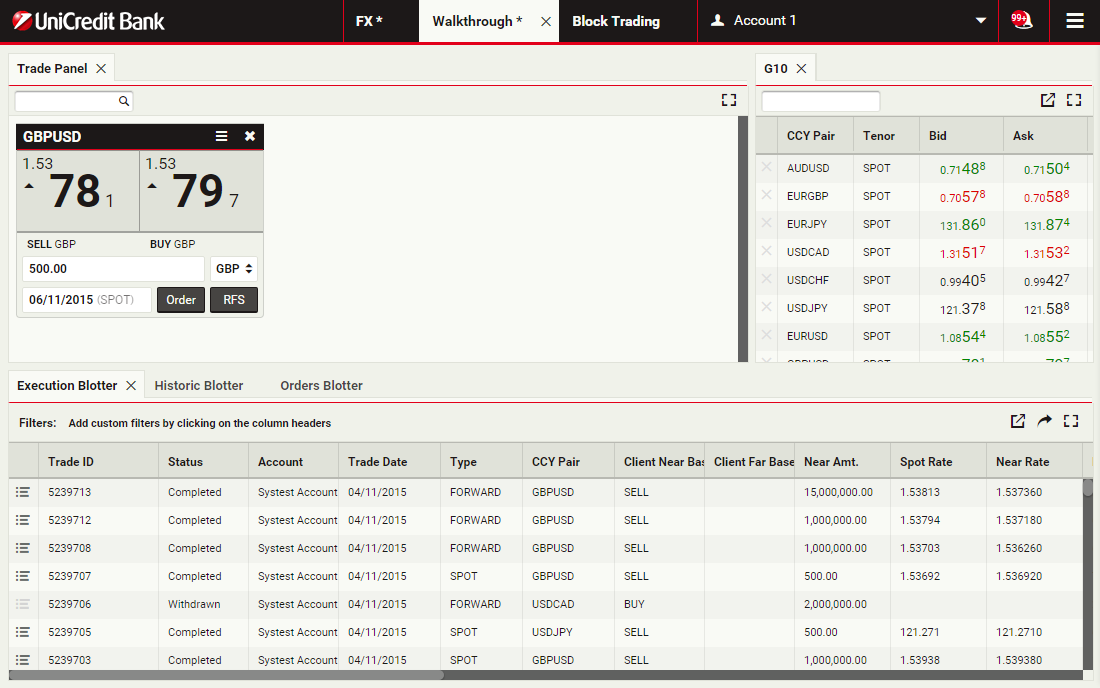
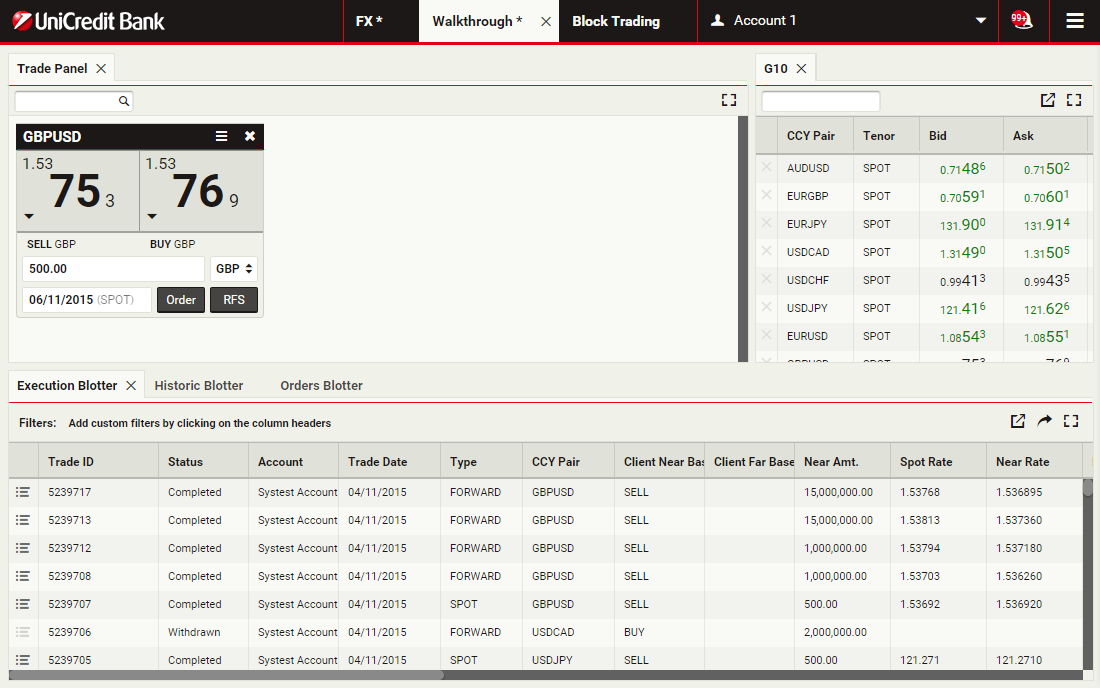
View the blotter entry
You can see the trades in the Execution Blotter and the Historical Blotter.
To review a trade's confirmation ticket at any time, click the detail icon for the trade's entry in the blotter
To review a trade's confirmation ticket at any time, click the detail icon for the trade's entry in the blotter
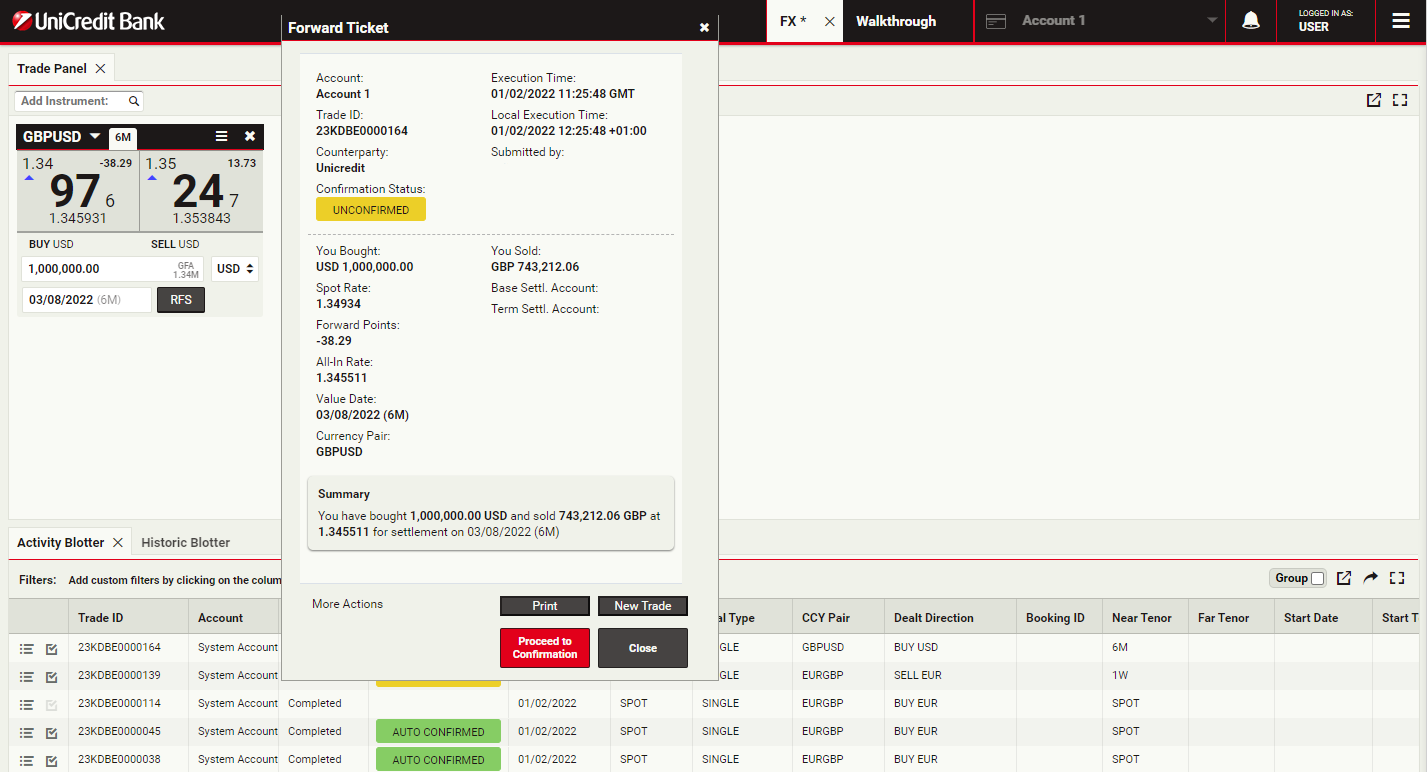
Review the ticket
To review costs and checks, and to perform the confirmation step, click Proceed to Confirmation
Trading FX with RFQ tickets
Trading tickets allow you to request an executable streaming quote for spot, outright forwards, flexi forwards and swaps. As soon as you see a price on the ticket, you can click and immediately execute your deal.
ContinueLaunch a ticket
To launch an outright ticket for GBPUSD, click RFS on a GBPUSD outright tile
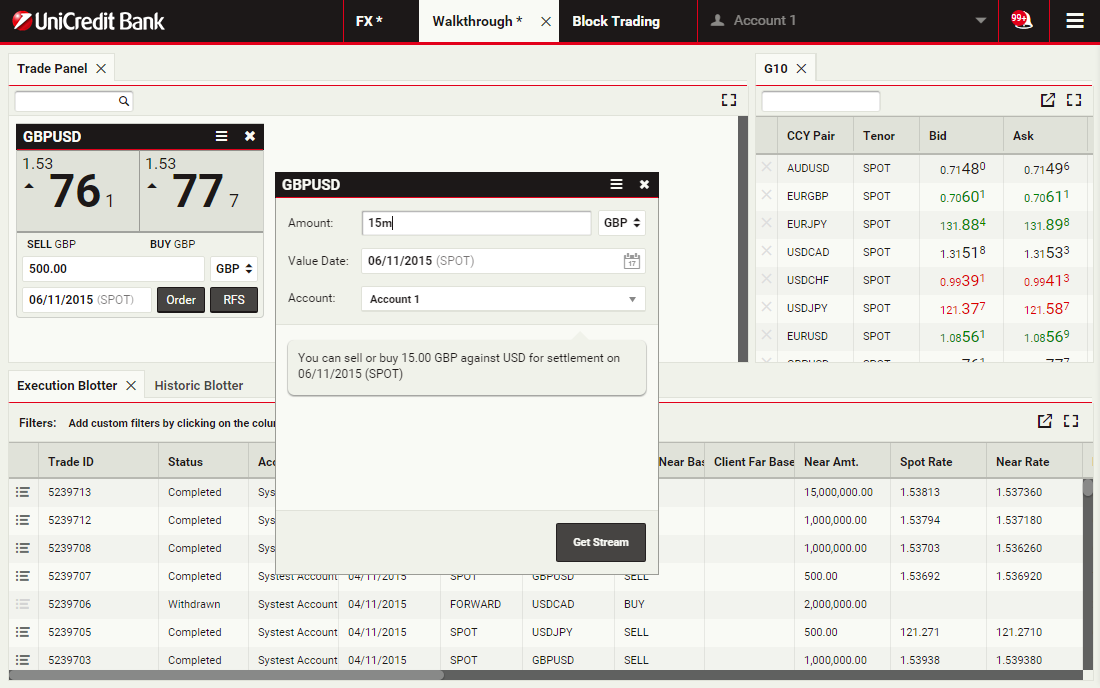
Specify a currency amount
The Amount field accepts numeric input and shorthand units of 'k', 'm' and 'b' for thousand, million and billion respectively.
To specify 15 million, you can type '15000000' or '15m'.
Click the Amount field to continue
To specify 15 million, you can type '15000000' or '15m'.
Click the Amount field to continue
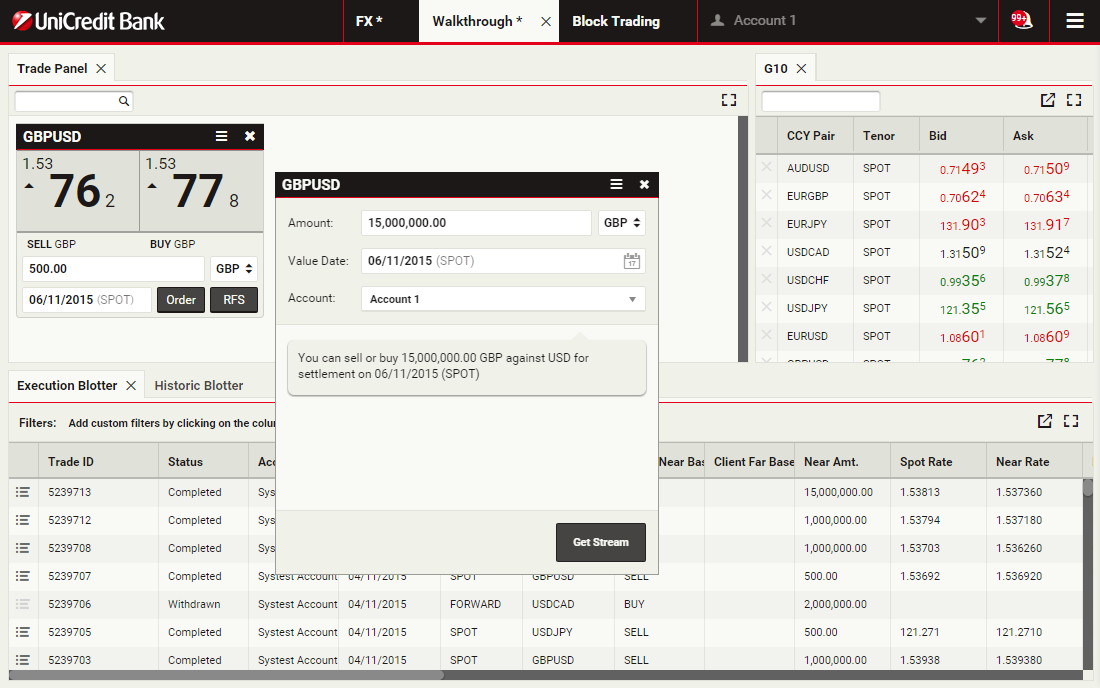
Select the dealt currency
Clicking the dealt currency field toggles between the base (GBP) and the counter (USD) currency of the ticket's currency pair (GBPUSD).
To change the dealt currency from GBP to USD, click the dealt currency field
To change the dealt currency from GBP to USD, click the dealt currency field
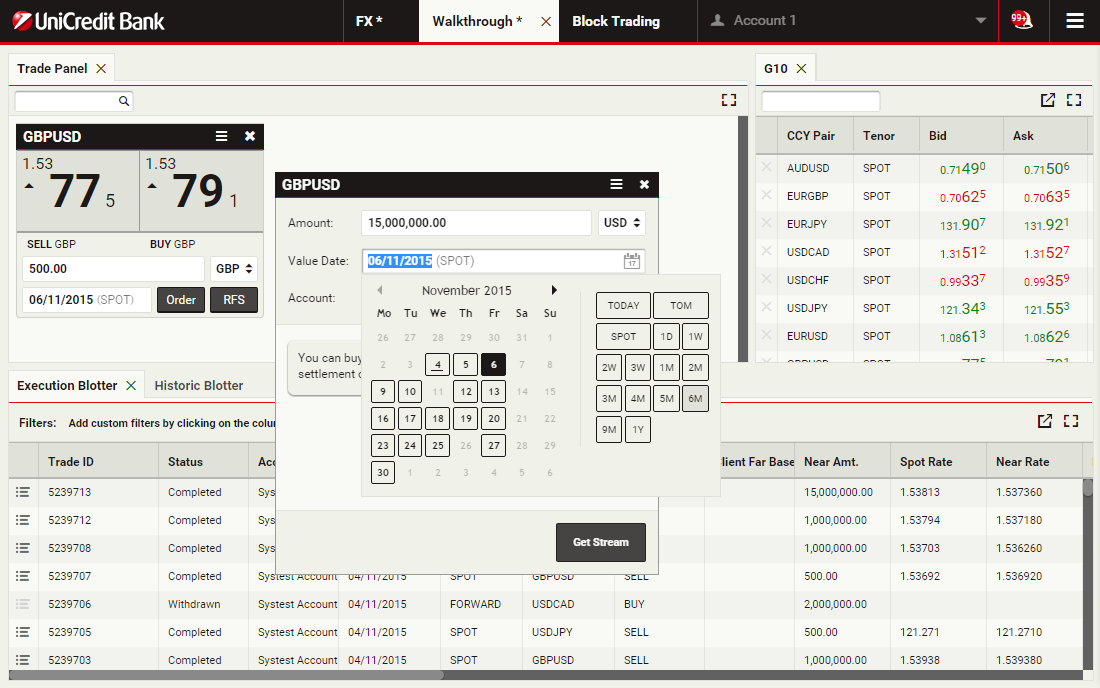
Select a value date
The default value date is spot. The date picker of the Value Date field provides a quick way to select tenors and broken dates.
To select a value date of 6 months forward, click the '6M' tenor
To select a value date of 6 months forward, click the '6M' tenor
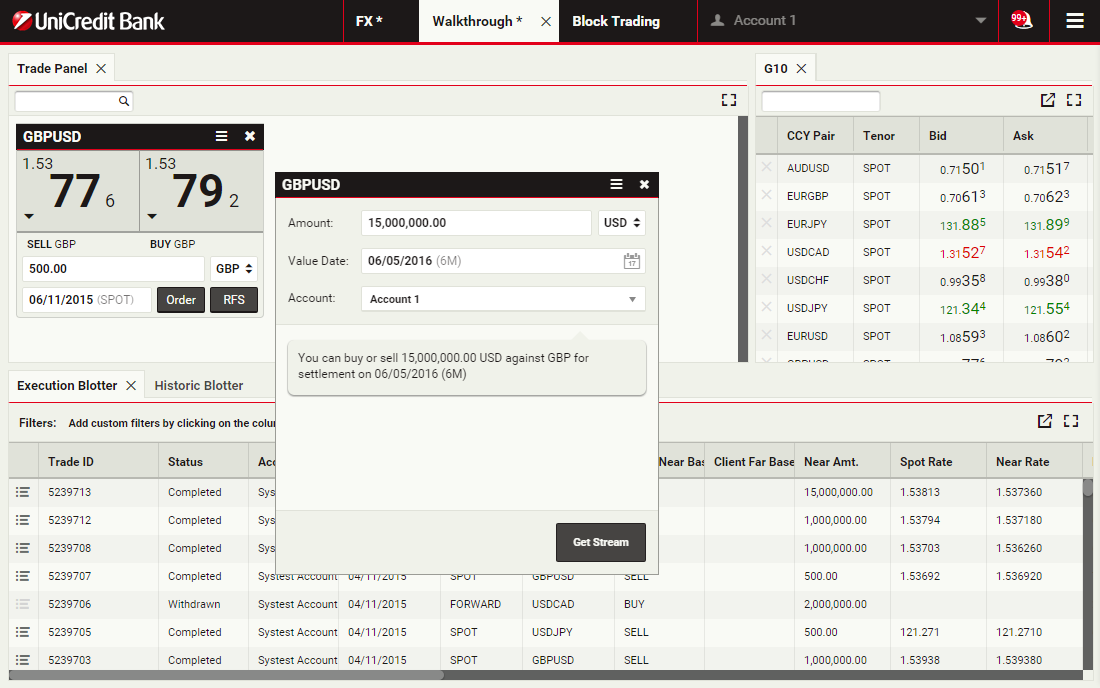
Get streaming prices
Click Get Stream to request an executable streaming quote
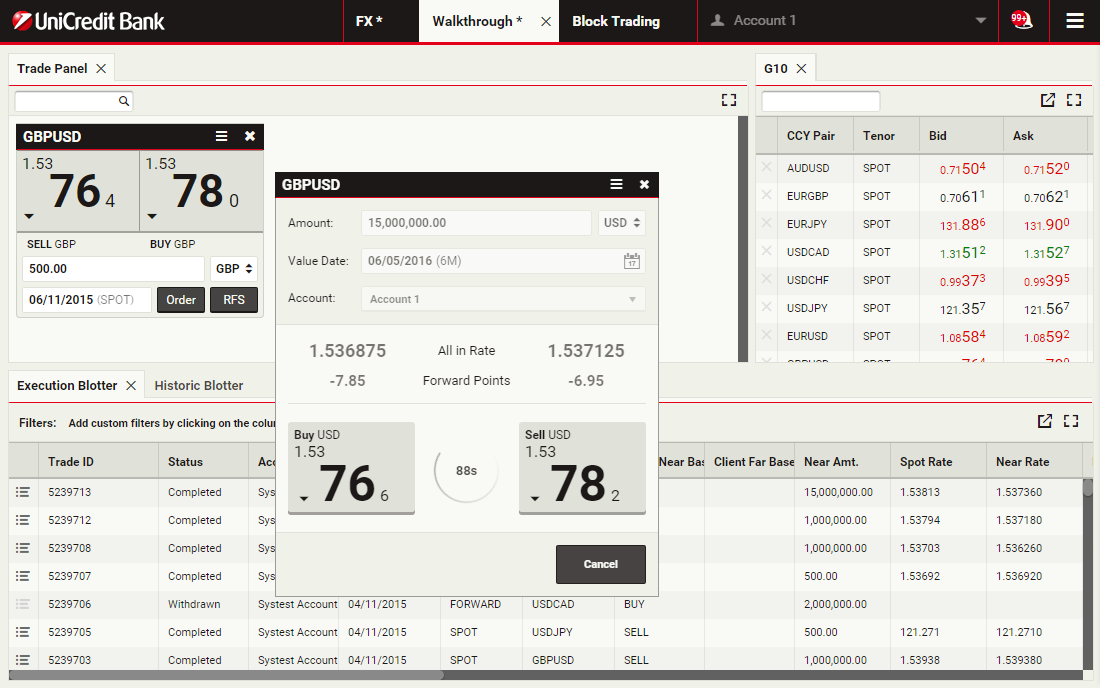
Execute the trade
Two streaming spot rates are displayed, complete with forward points and an all-in rate. The stream is only available for a limited time, and a countdown timer displays the remaining time for which the stream is available.
To execute the trade, click the left-hand rate, labelled 'BUY USD'
To execute the trade, click the left-hand rate, labelled 'BUY USD'
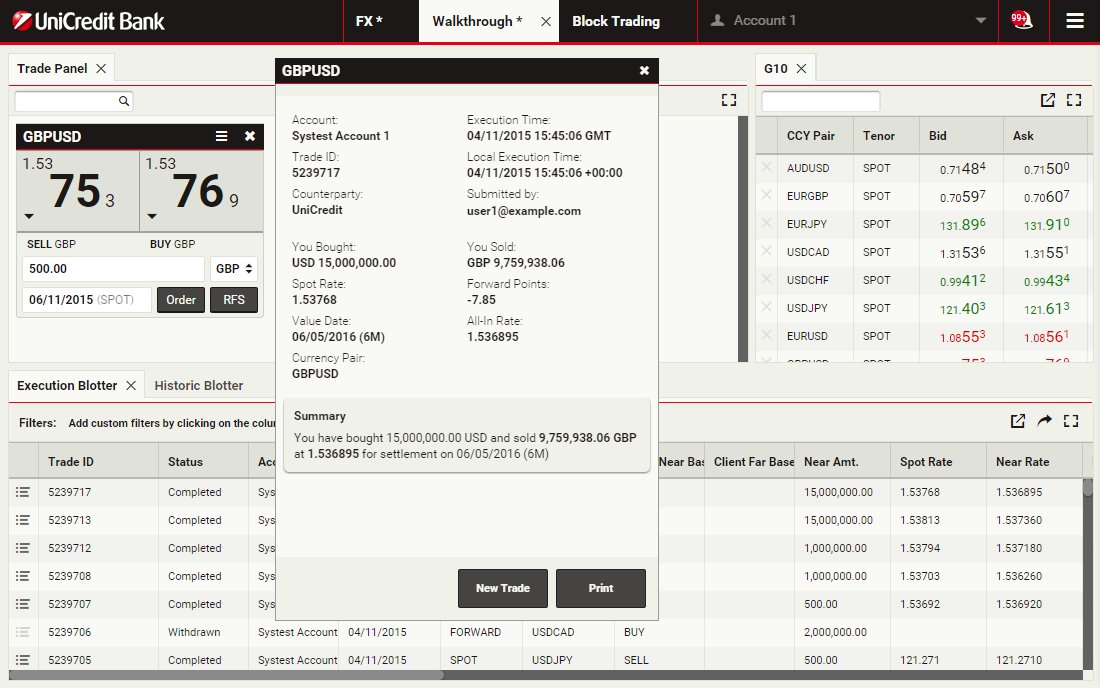
View the ticket
A ticket informs you that the trade was successful.
To close the ticket, click the cross in the top-right corner of the ticket
To close the ticket, click the cross in the top-right corner of the ticket
View the blotter entry
You can see the trades in the the Execution Blotter and in the Historical Blotter.
To review a confirmation ticket at any time, click the detail icon for the trade's entry in the blotter
To review a confirmation ticket at any time, click the detail icon for the trade's entry in the blotter
Review the ticket
To close the ticket, click Close
Confirming your trades
You can process all pending trade confirmations for your company directly from UCTrader.
ContinueReview and Proceed to confirmation
If you are enabled for digital trade confirmations, you can review your deal costs and charges and perform the confirmation step by clicking on Proceed to Confirmation
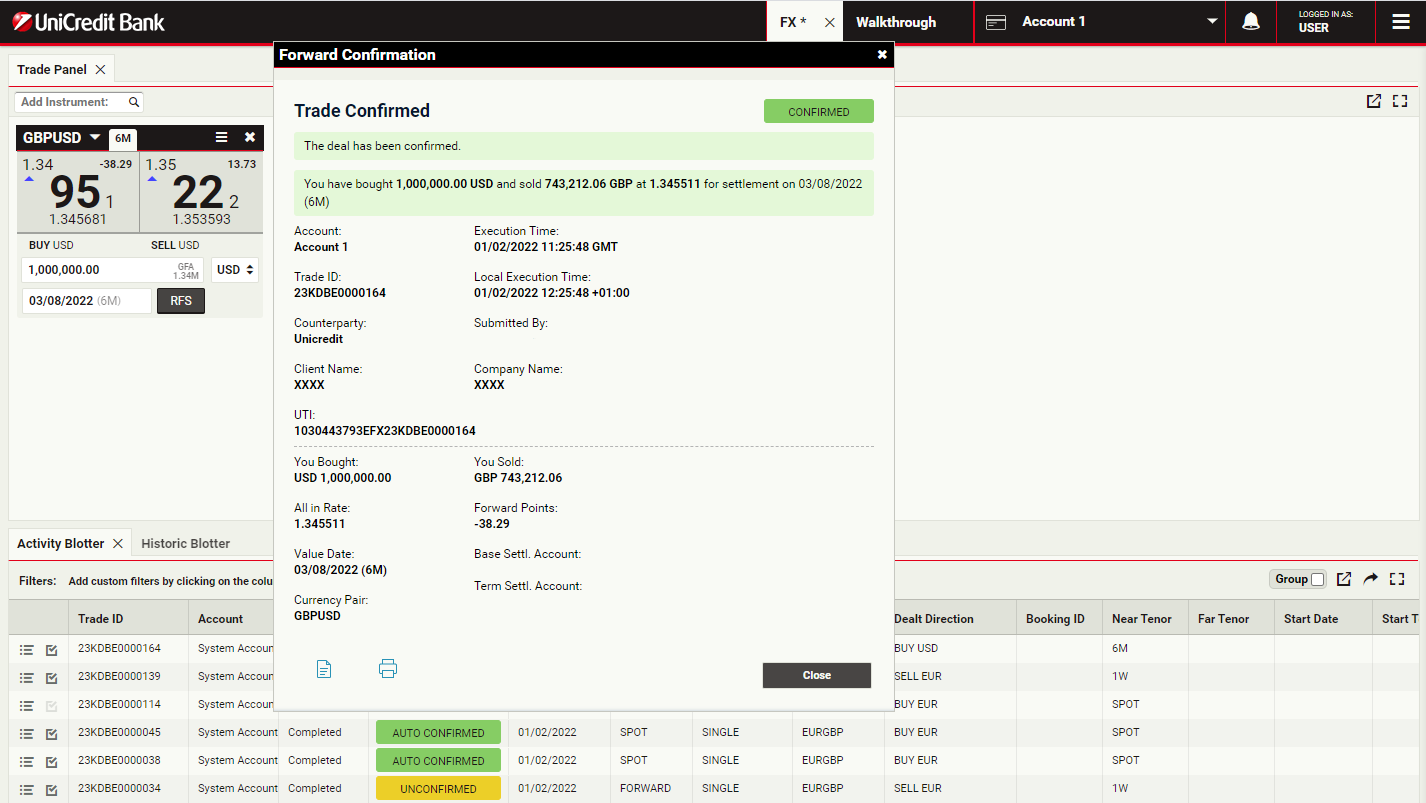
Confirm the trade
Trades settling before or on the spot date are considered automatically confirmed, whilst all Forward, Swap and Block trades settling after spot must be explicitly confirmed by customers.
To confirm your trade, click Confirm.
If you wish to save or print a copy of your trade confirmation click either the file or print icons
To confirm your trade, click Confirm.
If you wish to save or print a copy of your trade confirmation click either the file or print icons
Review the ticket
To close the ticket, click Close
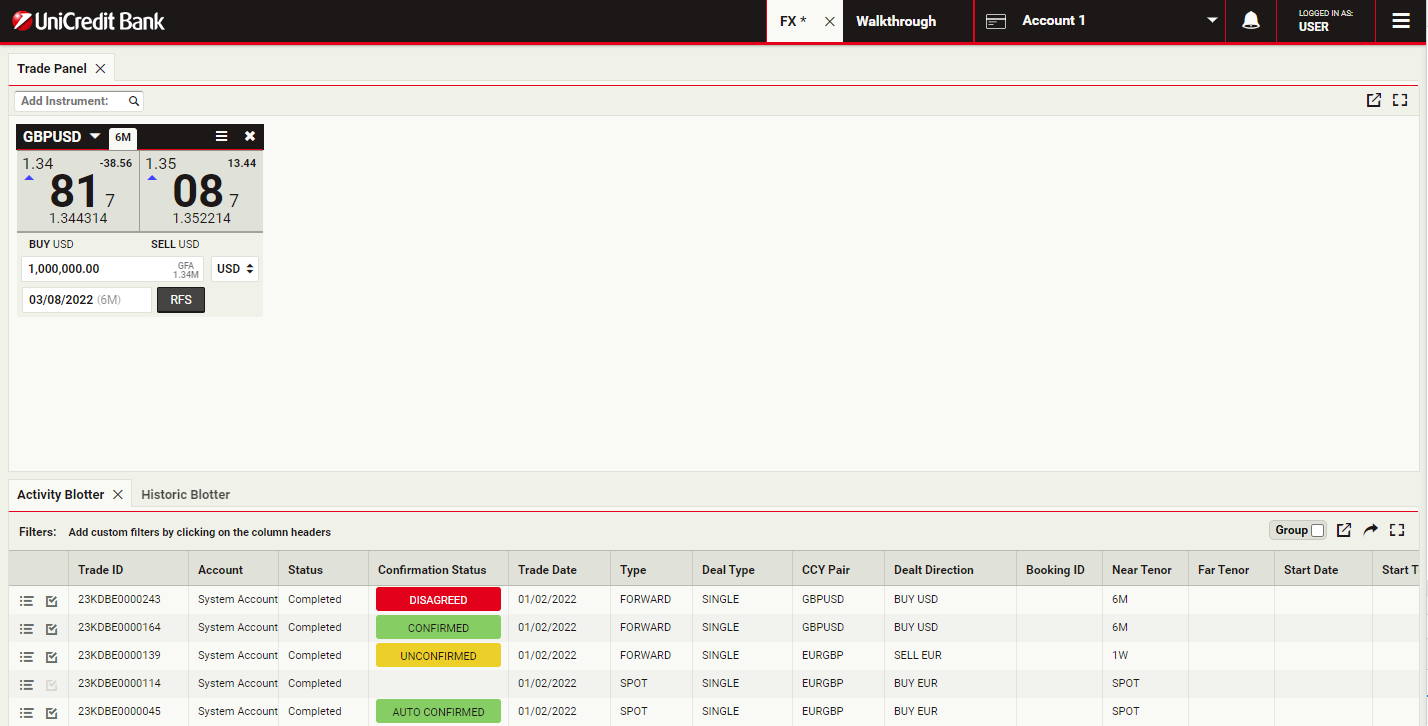
Viewing confirmations in the blotter
All the confirmations are stored and displayed in the Historical Blotter, where it is possible to retrieve them and check the confirmation status, as well as costs and charges and trade UTIs
Trades can have different states:
- Unconfirmed
- Disagreed
- Confirmed
To review a ticket, click the detail icon for the trades entry in the blotter
Trades can have different states:
- Unconfirmed
- Disagreed
- Confirmed
To review a ticket, click the detail icon for the trades entry in the blotter
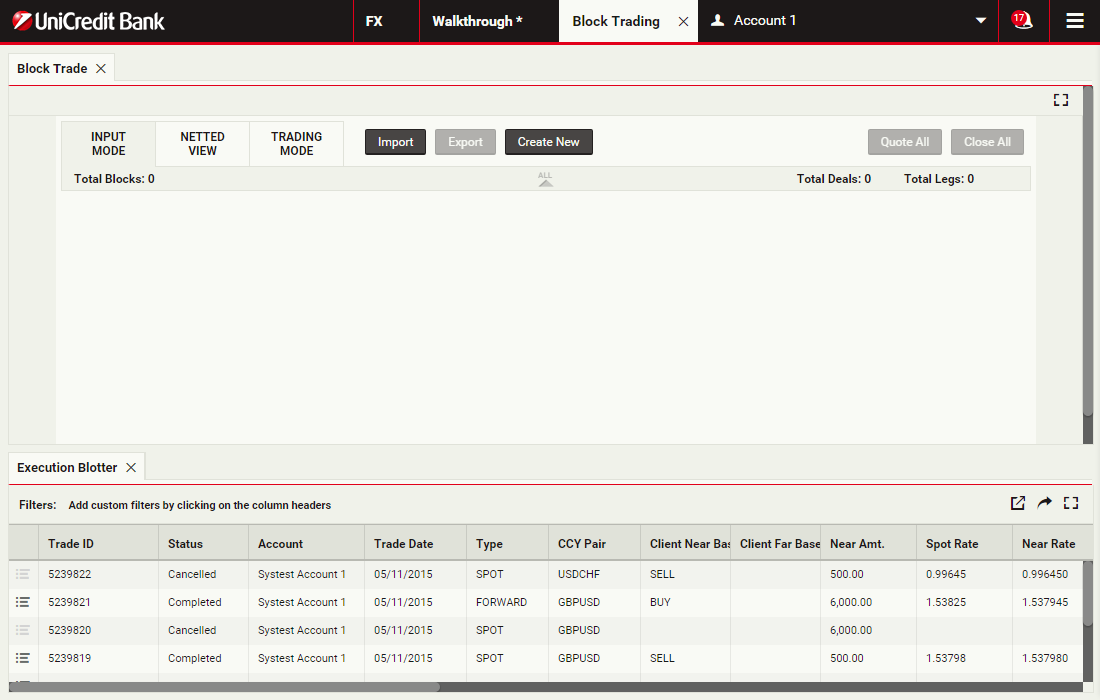
Trading FX block deals
Using block trading, you can submit a request for a single executable quote on simultaneous deals in the same currency pair across multiple accounts and valuation dates. You can enter the deals directly or upload them in a spreadsheet template and UCTrader will automatically validate and net them where possible.
For more information or to request enablement of this feature, please contact your sales person.
ContinueFor more information or to request enablement of this feature, please contact your sales person.
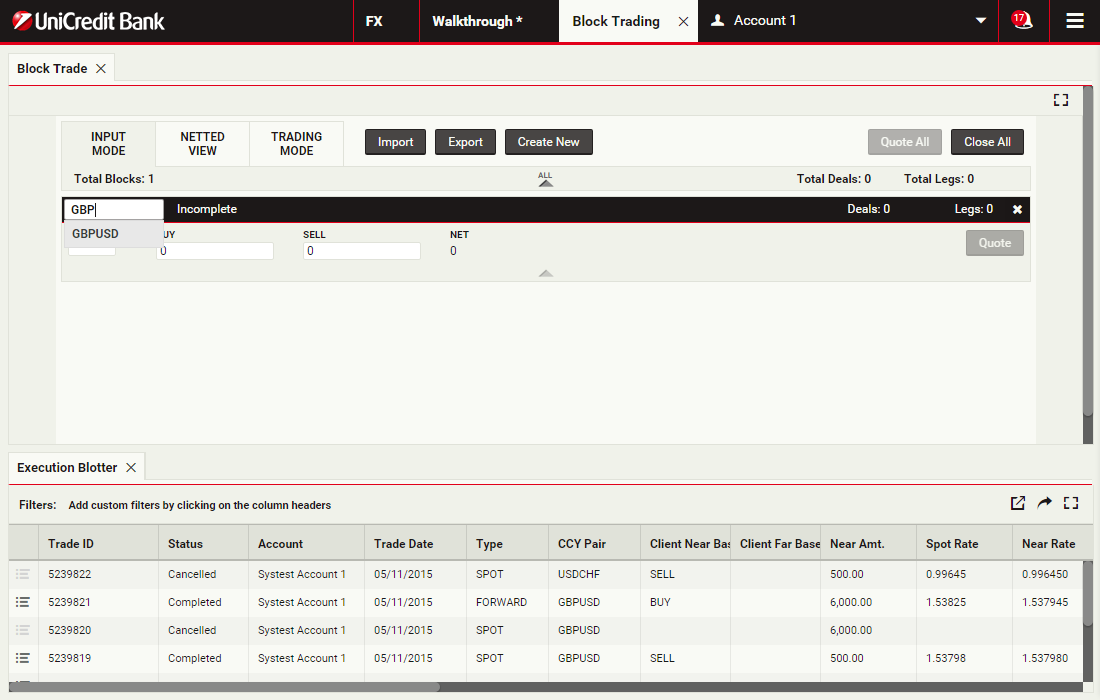
Create a new block
Click Create New to create a block in UCTrader. You can also import it from spreadsheet
Specify the currency pair
Deals within the same block are restricted to the same currency pair and dealt currency.
To specify GBPUSD, you would type 'GBPUSD' into the currency pair field.
Click 'GBPUSD' to continue
To specify GBPUSD, you would type 'GBPUSD' into the currency pair field.
Click 'GBPUSD' to continue
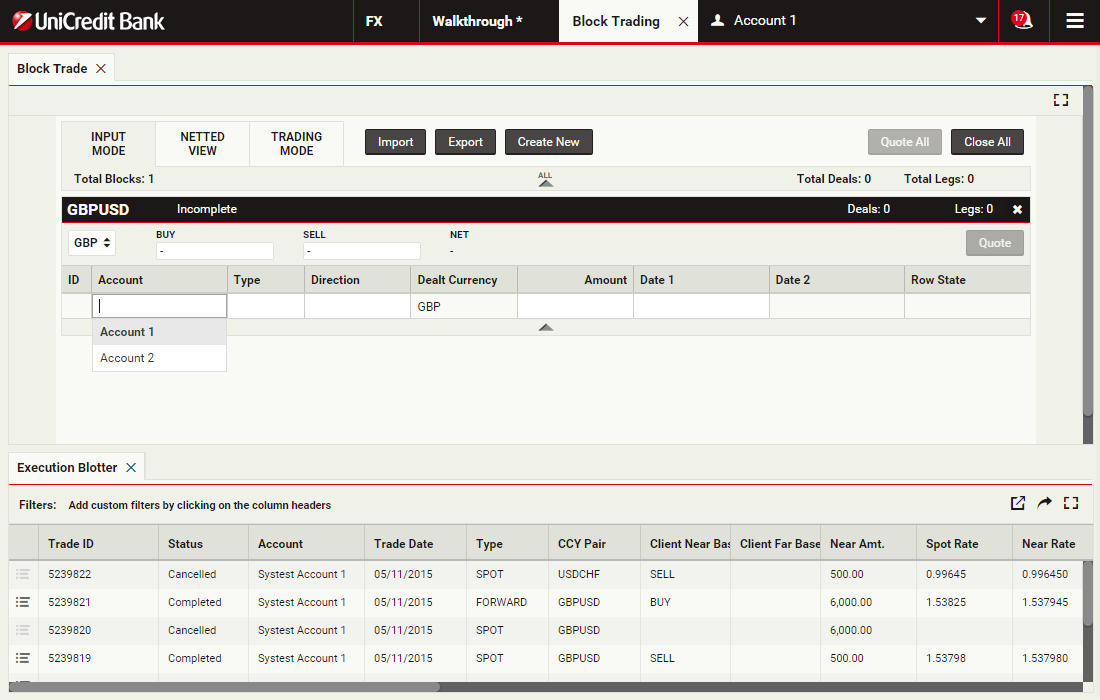
Select the trading account
Select 'Account 1' as the trading account for the first deal
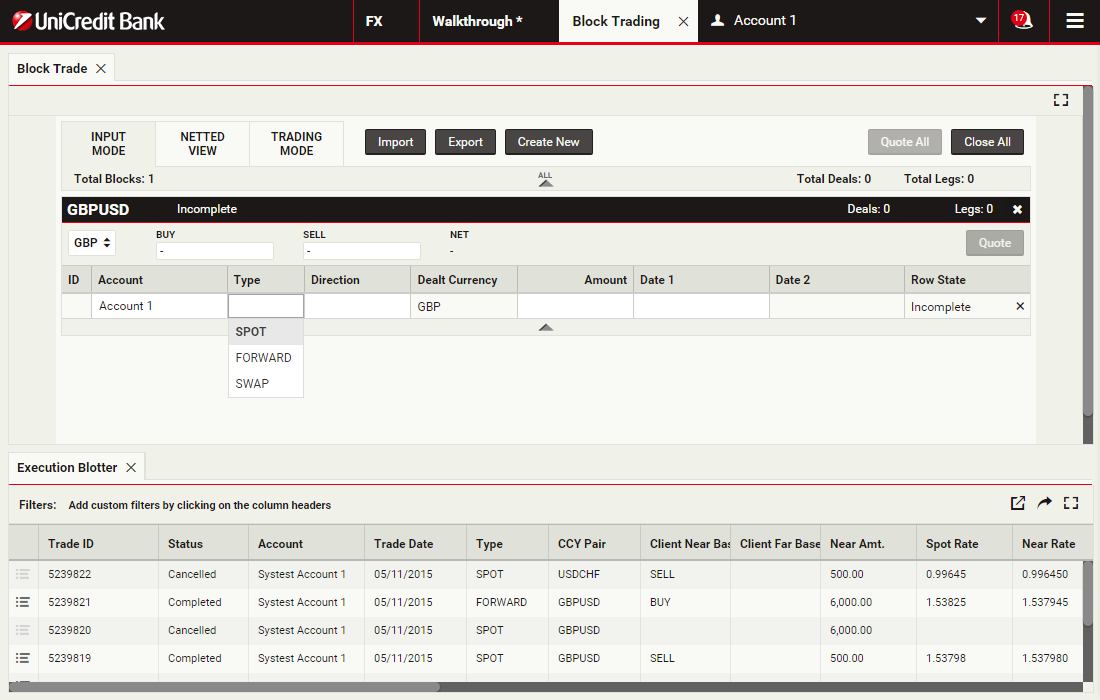
Select the trade type
Select 'SPOT'
Select the trade direction
Select 'BUY'
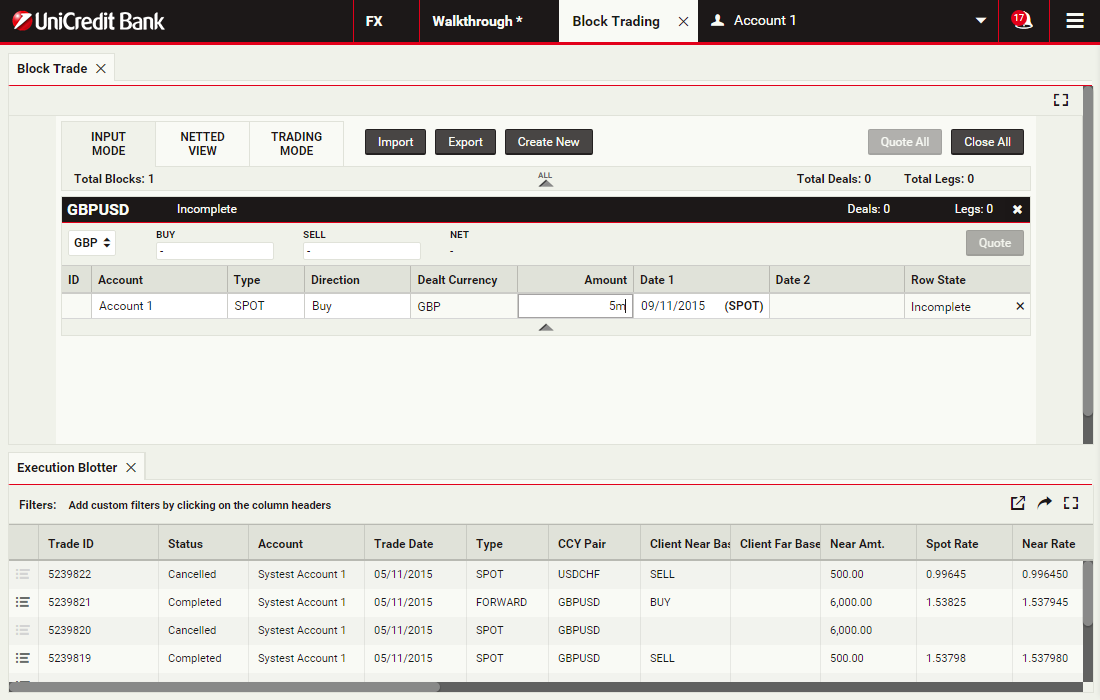
Specify the currency amount
The Amount column accepts numeric input and the shorthand units 'k', 'm' and 'b' for thousand, million and billion respectively.
To specify five million, you can type '5000000' or '5m'.
Click the Amount field to continue
To specify five million, you can type '5000000' or '5m'.
Click the Amount field to continue
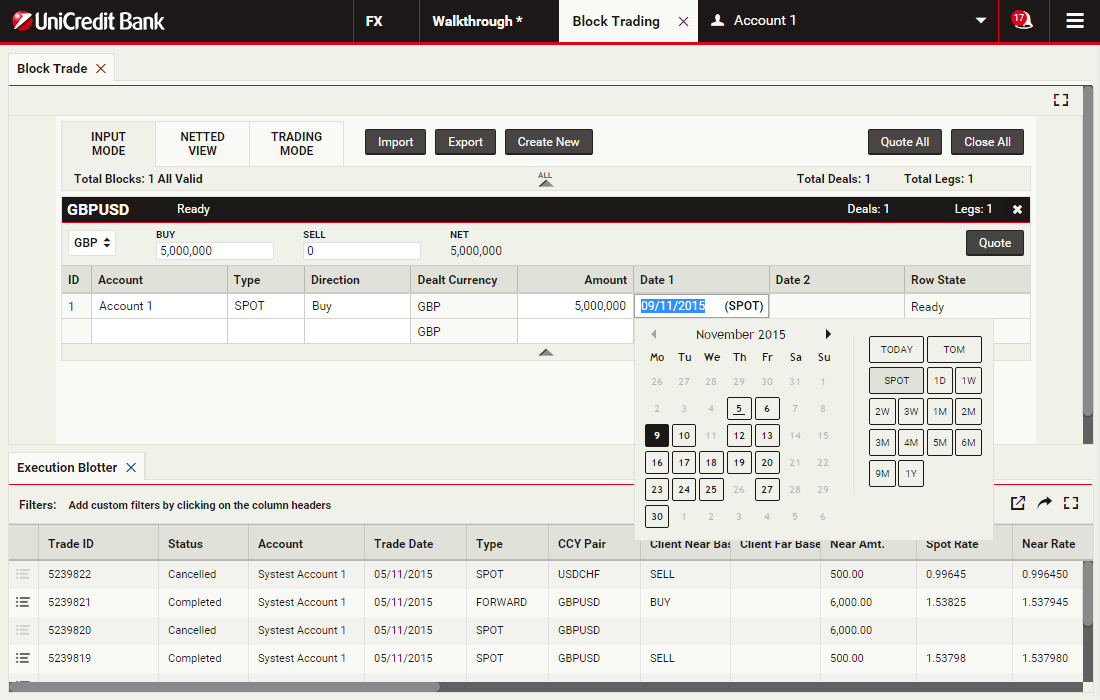
Select the value date
Deal rows have two date columns: 'Date 1' and 'Date 2'. For spot and forward trades, only the first date column is used. For swap trades, 'Date 1' corresponds to the value date of the near leg, and 'Date 2' corresponds to the value date of the far leg.
Select 'SPOT' for Date 1
Select 'SPOT' for Date 1
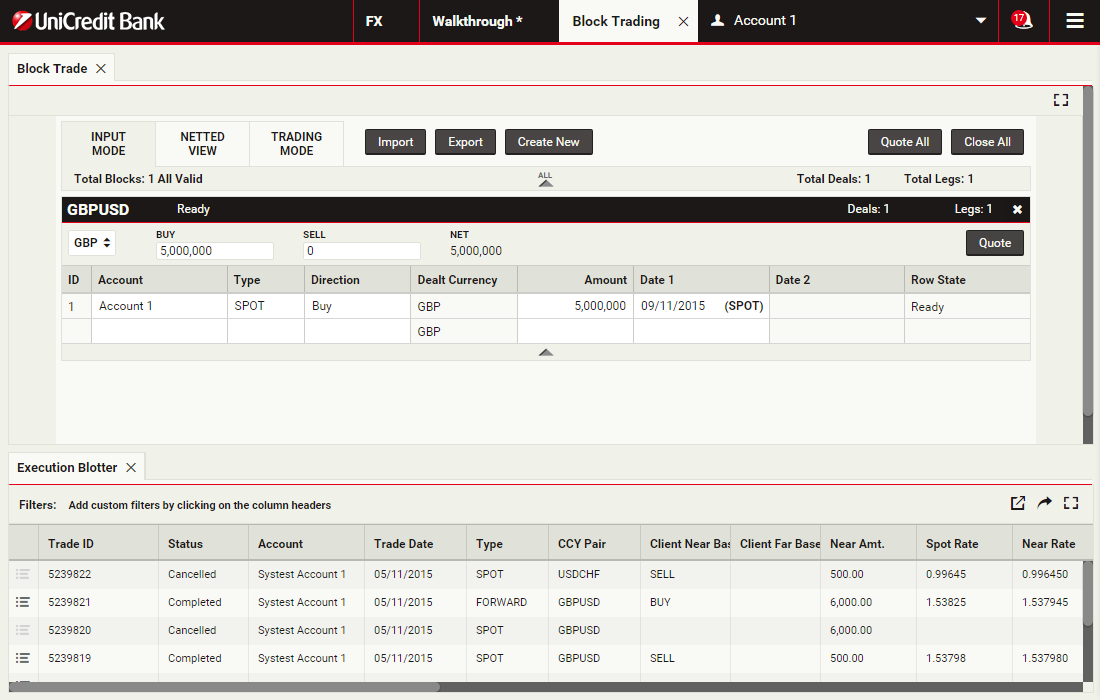
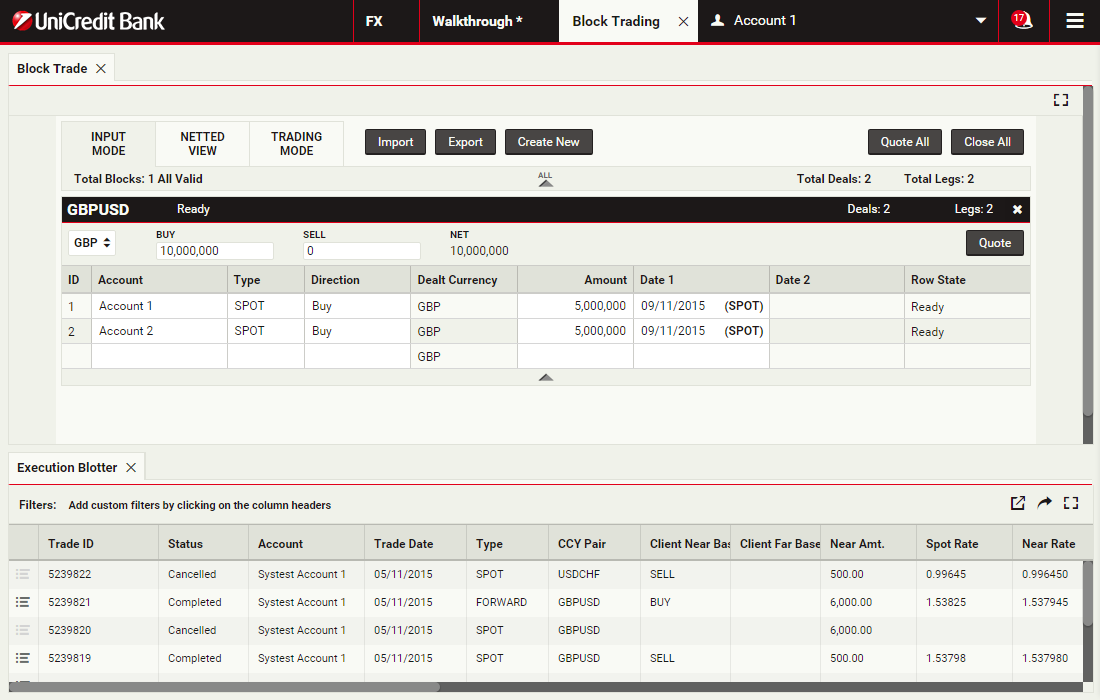
Add the second deal
Additional deals can be added to the block, one deal per row.
Click the second row to continue
Click the second row to continue
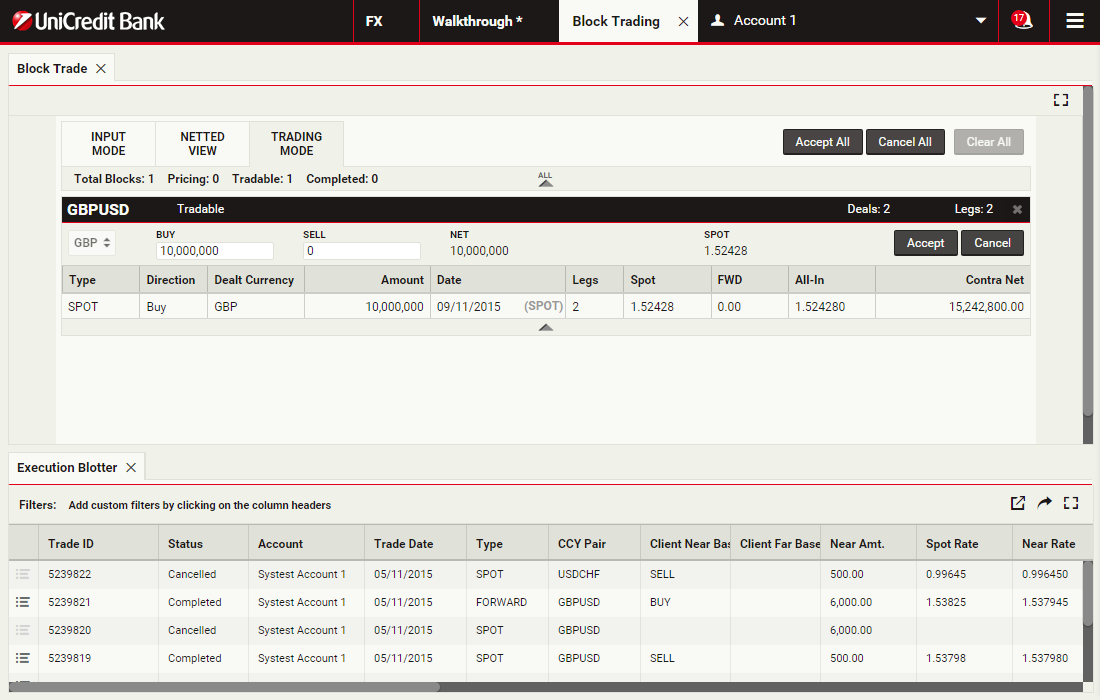
Price the block
To get a streaming price for the block, click Quote
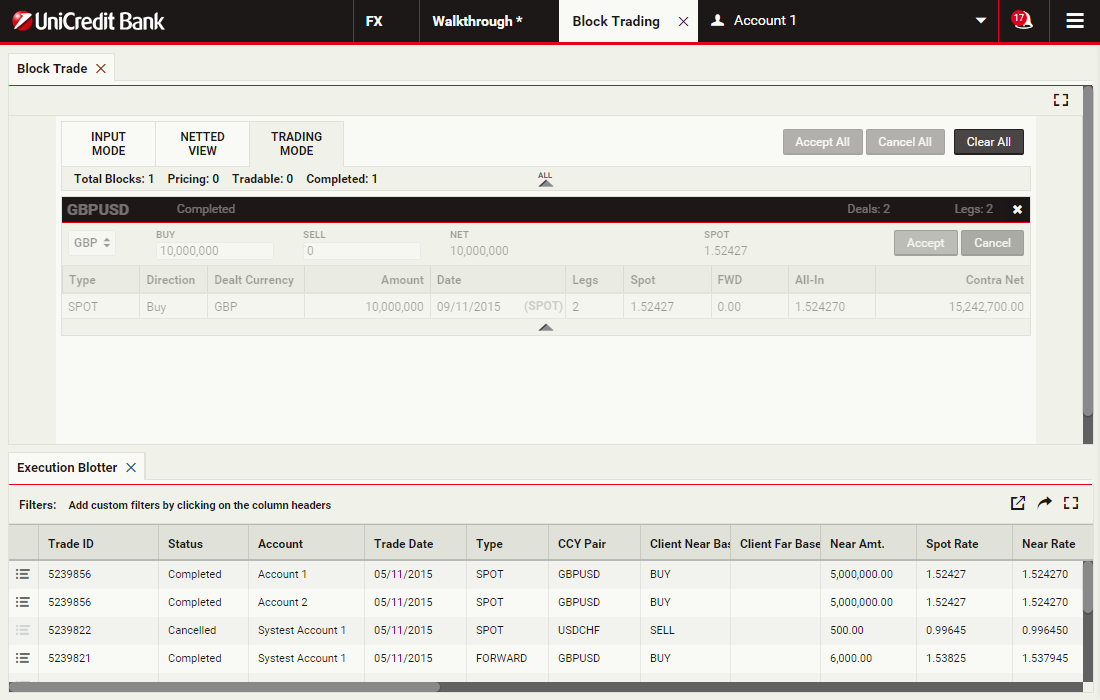
Execute the block
The two deals are of the same tenor and have been netted into a single trade.
To accept the quote and execute the block trade, click Accept
To accept the quote and execute the block trade, click Accept
View the blotter entries
The trade is recorded in the blotter as two entries: one for each deal in the (pre-netted) block. Both entries have the same Trade ID.
Click the first two blotter rows to continue
Click the first two blotter rows to continue
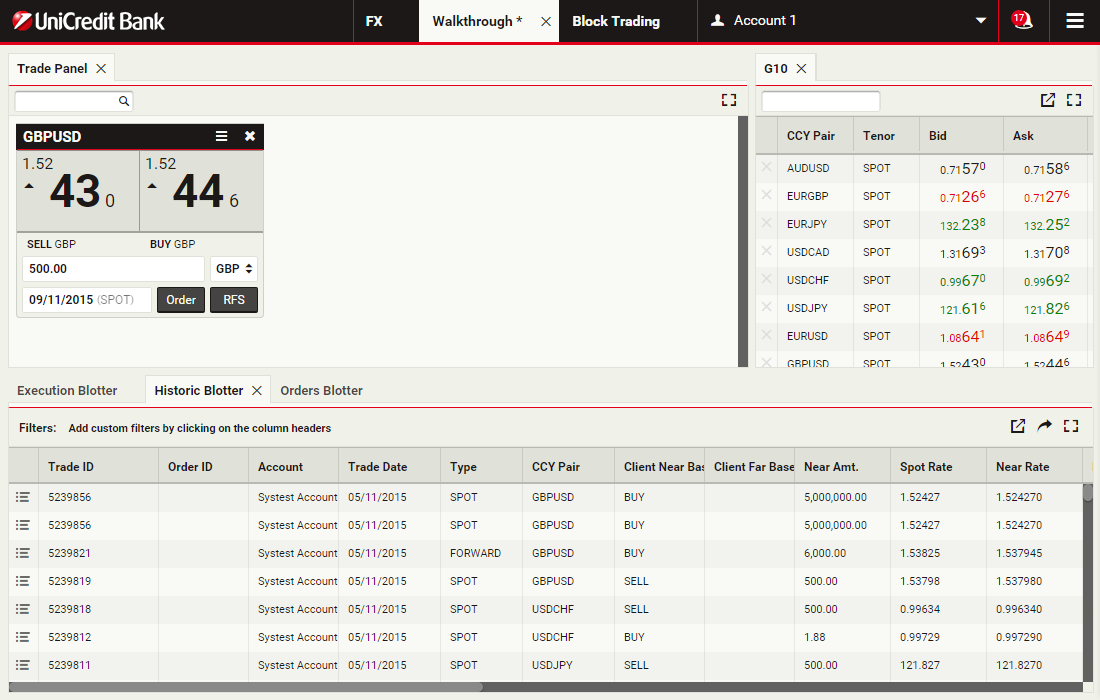
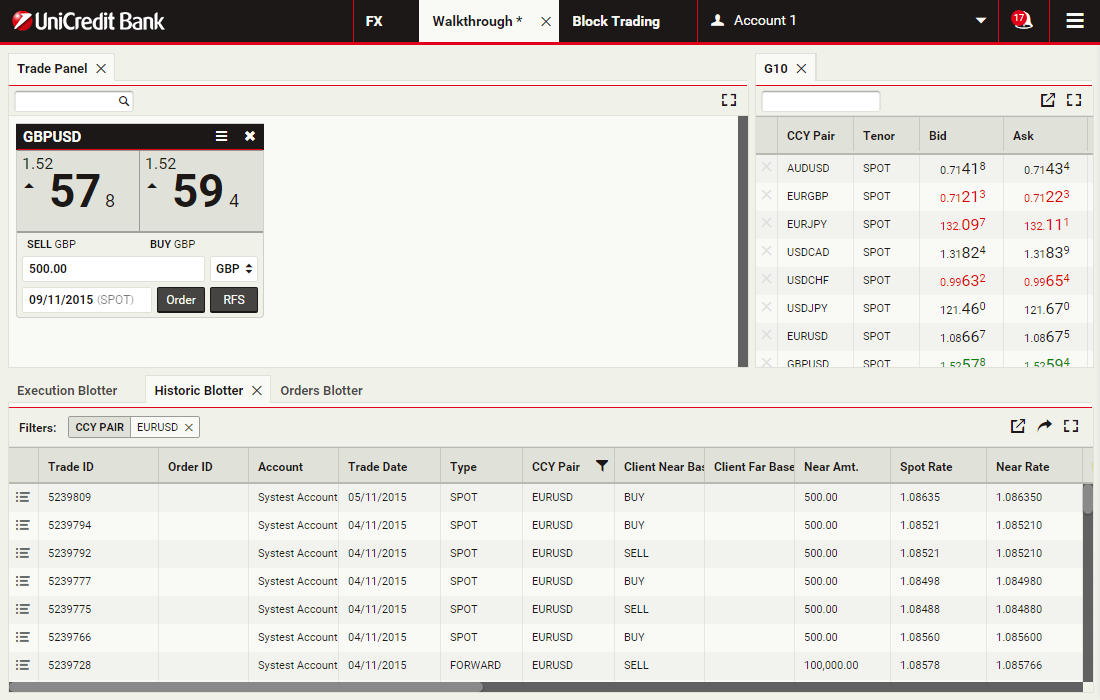
Open column options for 'CCY Pair'
To open the sorting and filtering options for the 'CCY Pair' column, click the column's heading
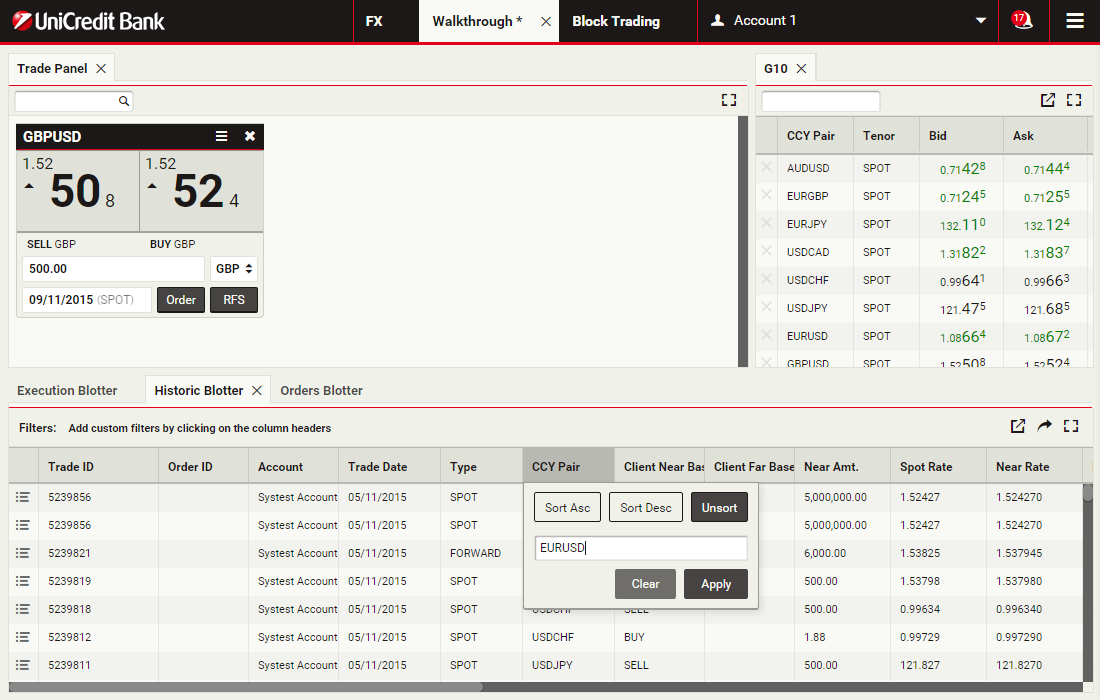
Specify filter criterion for 'CCY Pair'
Type 'EURUSD' into the filter field.
To apply the filter, click Apply
To apply the filter, click Apply
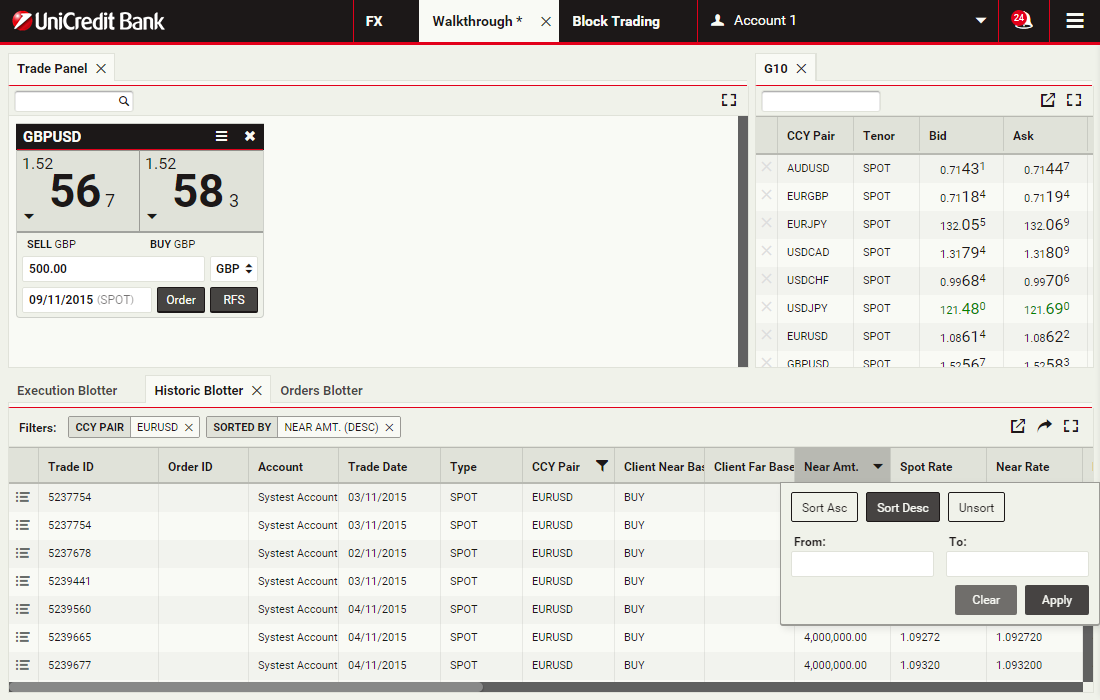
Open column options for 'Near Amt.'
To open the sorting and filtering options for the 'Near Amt.' column, click the column's heading
Specify the sort for 'Near Amt.'
To sort blotter entries in descending order of the amount of currency traded, click Sort Desc.
To apply the sorting criterion, click Apply
To apply the sorting criterion, click Apply
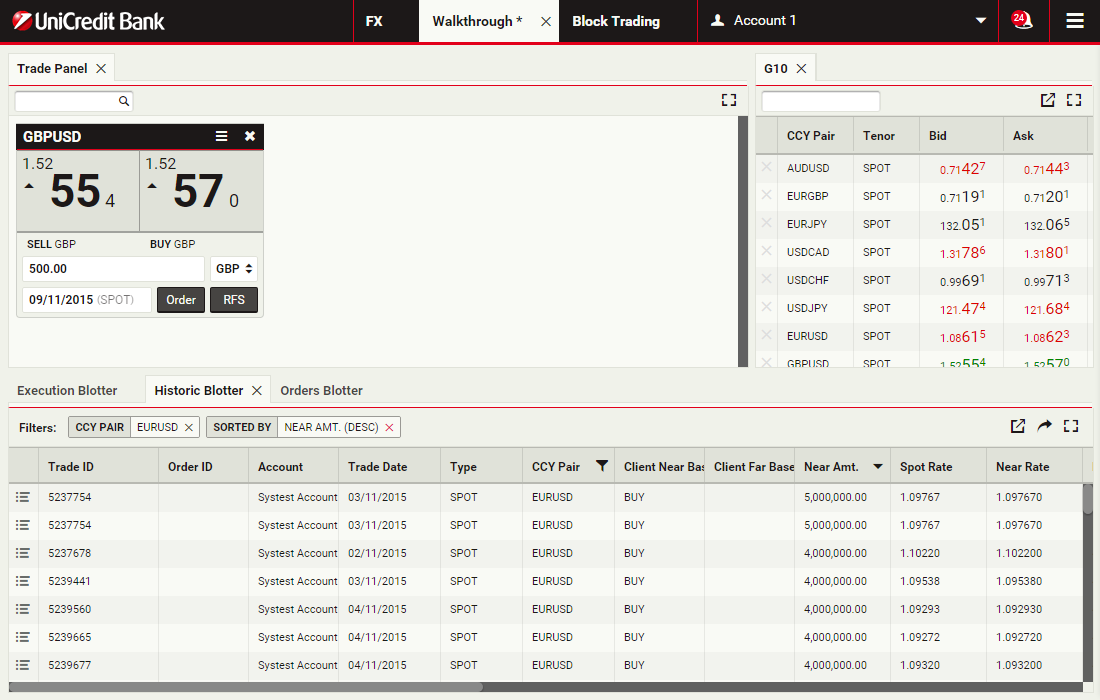
Removing a filter
To remove a filter, click on the cross
Placing an FX order
UCTrader supports placing single orders and conditional orders.
Access to the Orders Module is determined by regional business policy and your individual access privileges. For more information, please see your sales contact.
In this walkthrough, you will use a GBPUSD order ticket to prepare and submit a Take Profit order to sell 1 million GBP, with a Time-in-Force (TIF) of 1 month after spot.
ContinueAccess to the Orders Module is determined by regional business policy and your individual access privileges. For more information, please see your sales contact.
In this walkthrough, you will use a GBPUSD order ticket to prepare and submit a Take Profit order to sell 1 million GBP, with a Time-in-Force (TIF) of 1 month after spot.
Launch an order ticket
To launch a GBPUSD order ticket, click Order on a GBPUSD tile
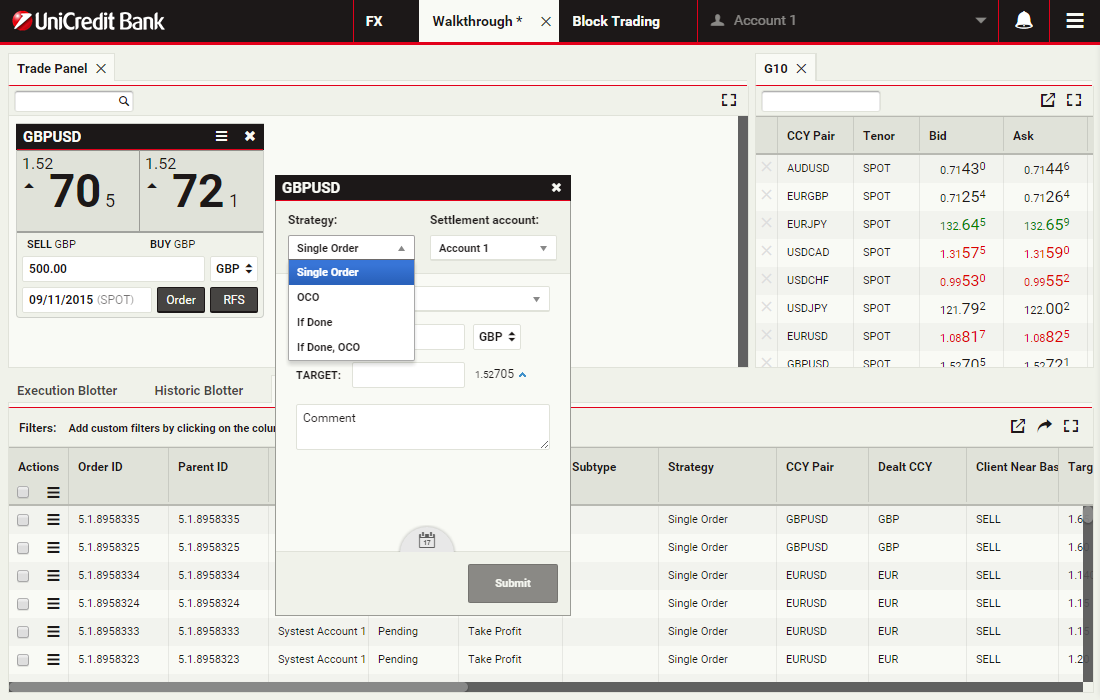
Select the order strategy
Select 'Single Order' from the Strategy dropdown list
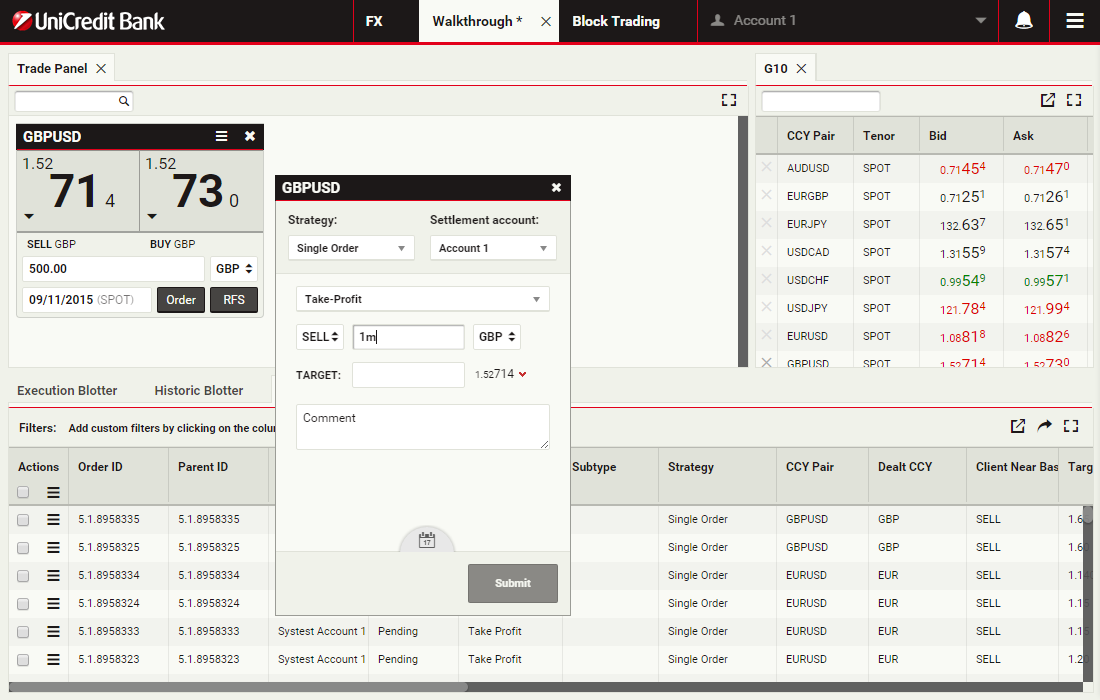
Select the order type
Select 'Take Profit' from the Order Type dropdown list
Specify the currency amount
The Amount field accepts numeric input and shorthand units of 'k', 'm' and 'b' for thousand, million and billion respectively.
To specify 1 million, you can type '1000000' or '1m'.
Click the Amount field to continue
To specify 1 million, you can type '1000000' or '1m'.
Click the Amount field to continue
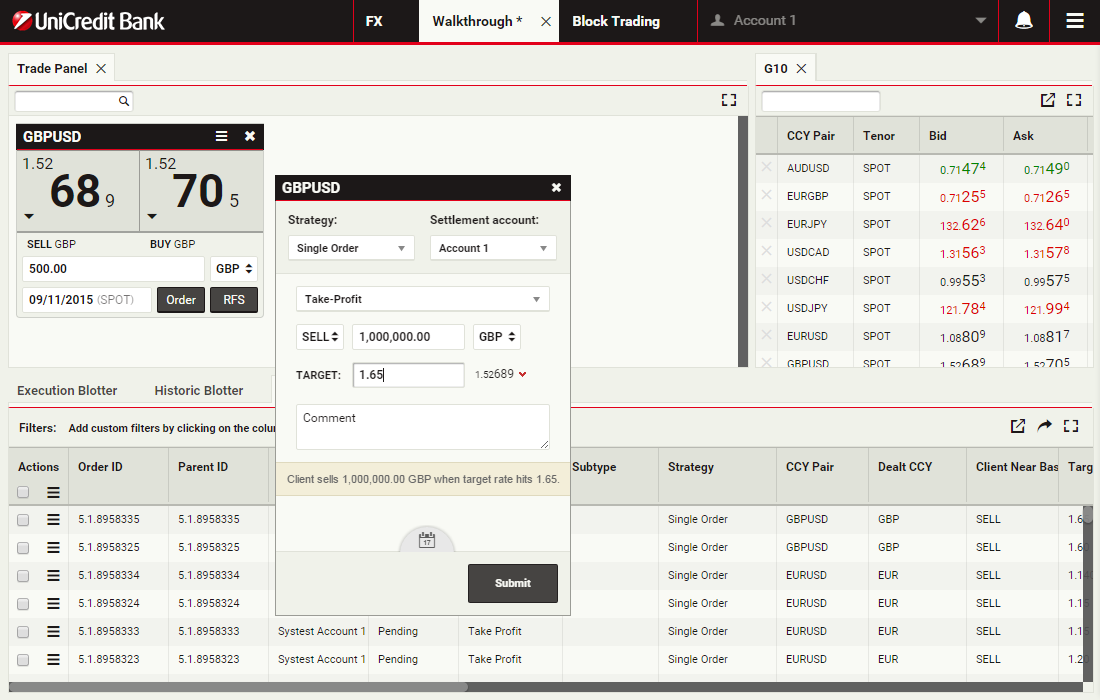
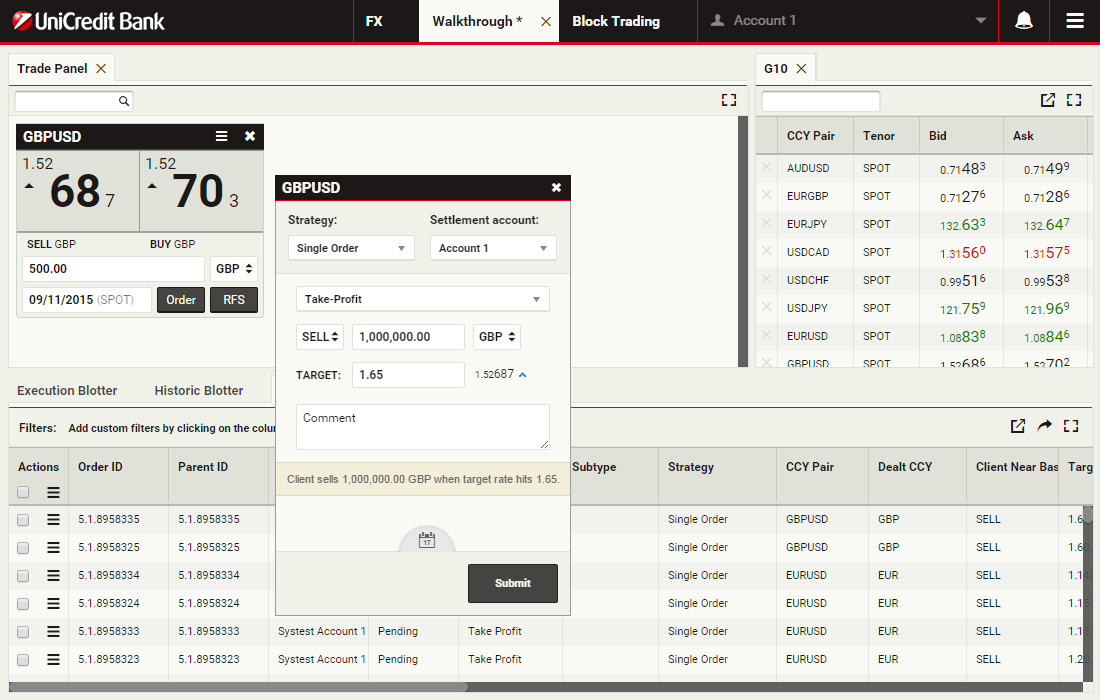
Specify the target price
Type the target price at which to sell. The target price for a Take Profit order must be above the current market price.
Click the Target Price field to continue
Click the Target Price field to continue
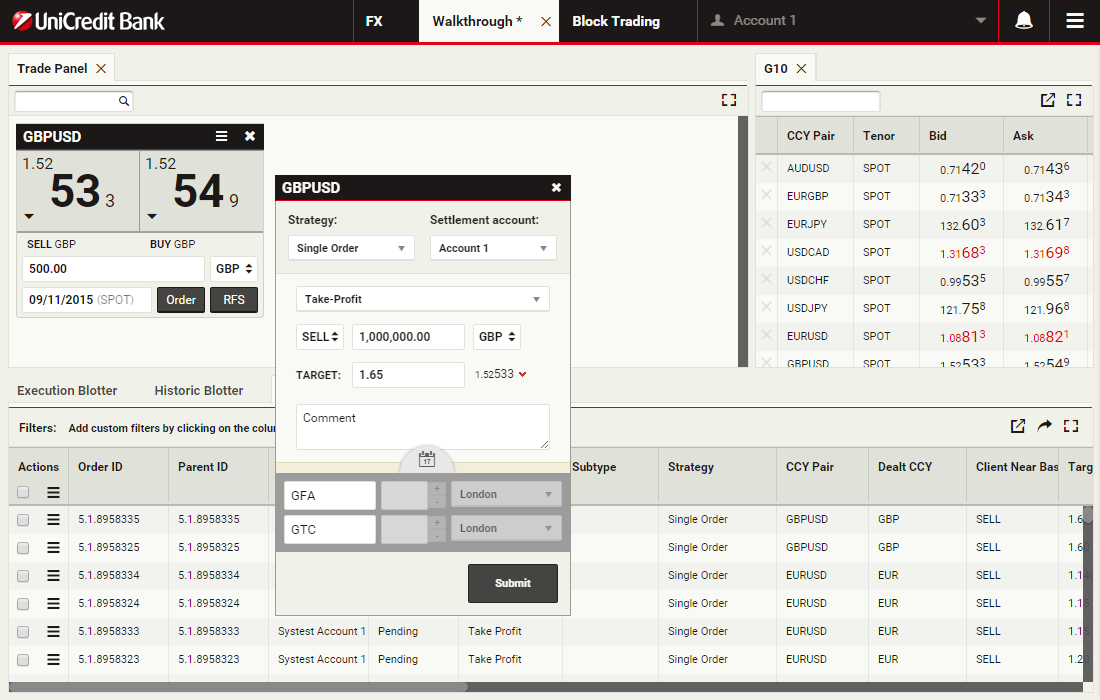
Open the Time-in-Force panel
To set the cancellation date of one month after spot, you will need to open the Time-in-Force panel.
To open the Time-in-Force panel, click the calendar icon
To open the Time-in-Force panel, click the calendar icon
Open the Cancellation Date field's date picker
To open the Cancellation Date field's date picker, click on the Cancellation Date field
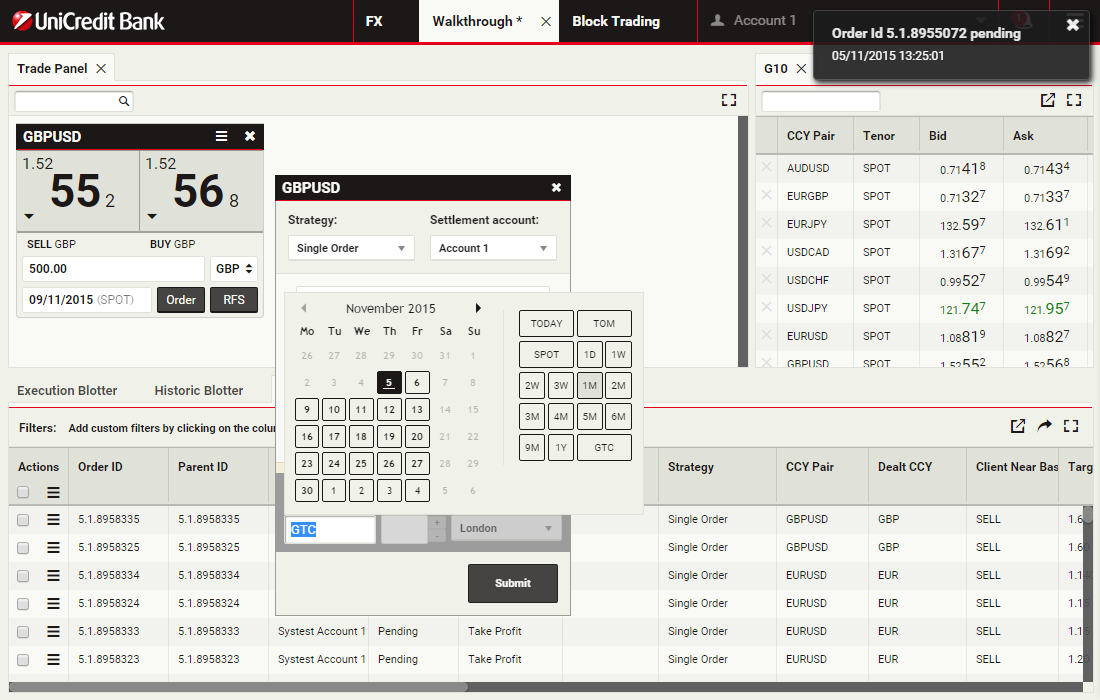
Specify the cancellation date
Change the cancellation date from Good-'Til-Cancelled (GTC) to 1M (one month after spot).
Click '1M' in the date picker of the Cancellation Date field
Click '1M' in the date picker of the Cancellation Date field
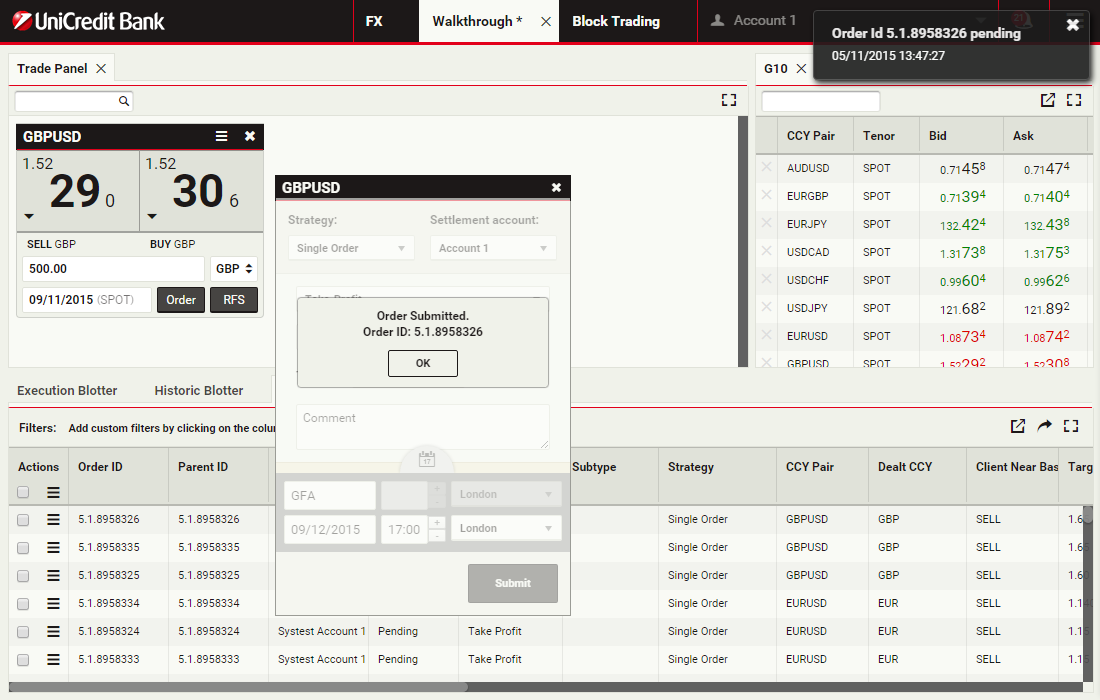
Submit the order
To submit the order, click Submit
View the submission confirmation
Click OK to continue
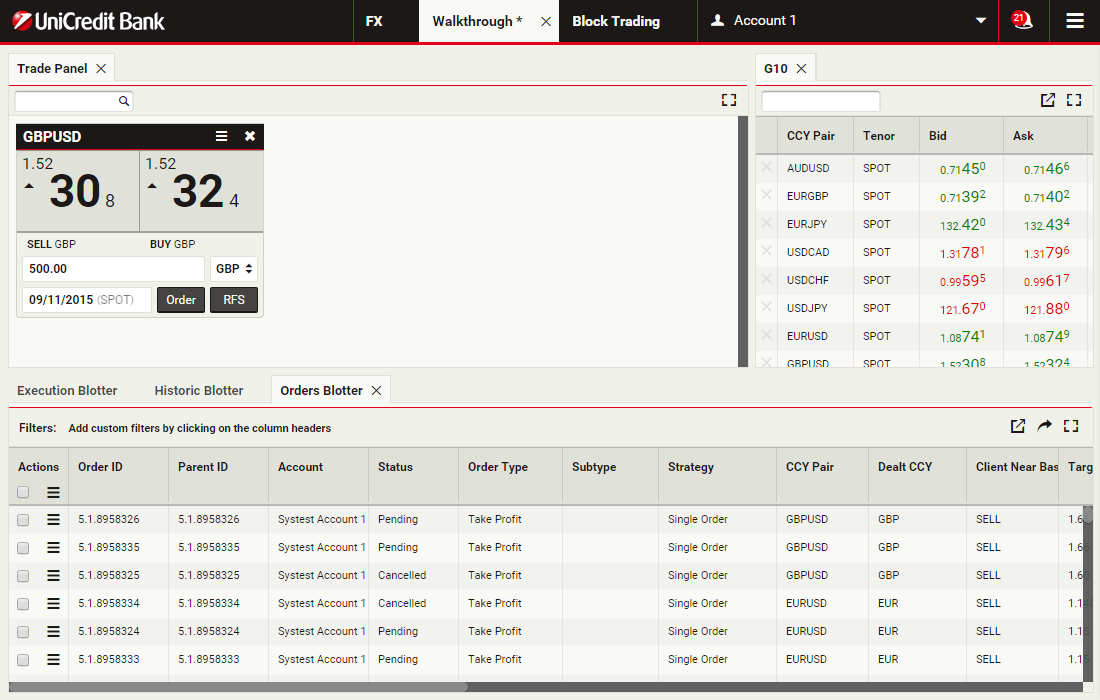
Read notification
When any order status changes, e.g. it becomes active or is filled, a notification will appear in the top-right corner of the screen.
You can click the notification's cross icon to dismiss it
You can click the notification's cross icon to dismiss it
Open notification tray
A numeric badge shows the number of unread notifications.
Click the icon to review previous notifications
Click the icon to review previous notifications
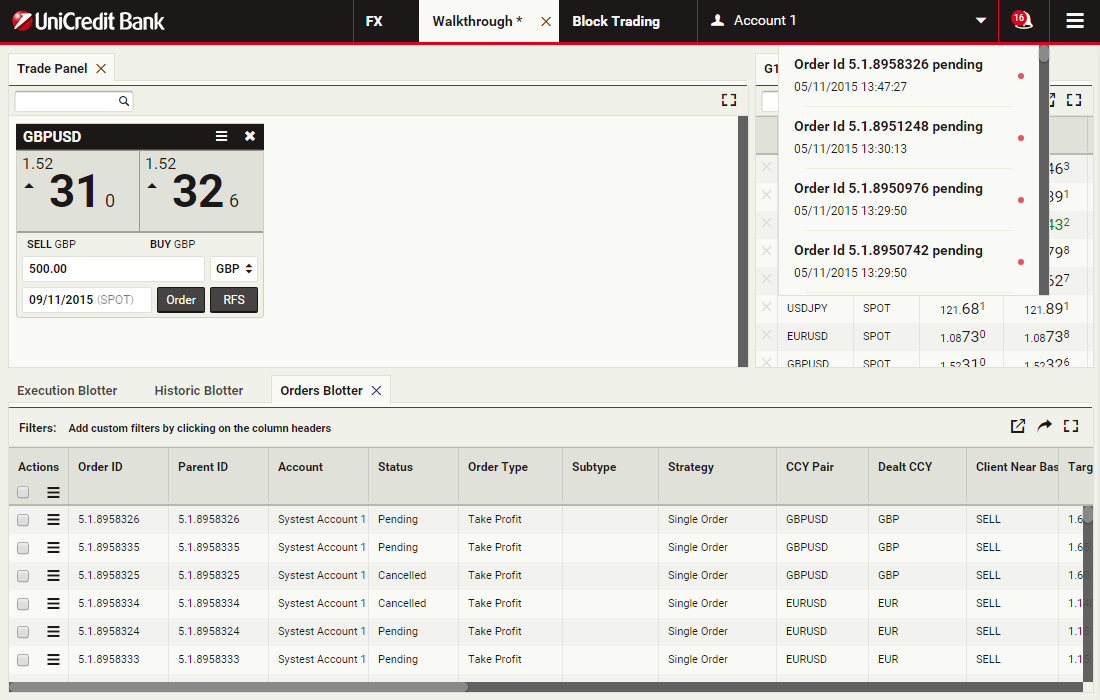
Review previous notifications
A red dot appears next to unread notifications.
Click the notification icon again to close the dropdown
Click the notification icon again to close the dropdown
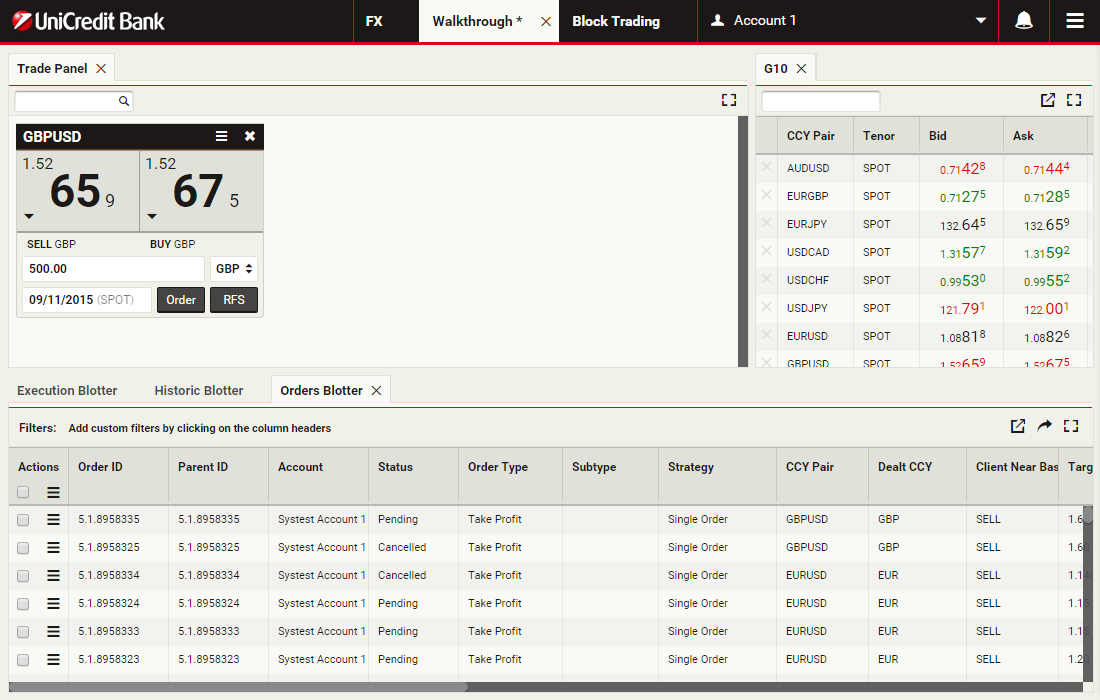
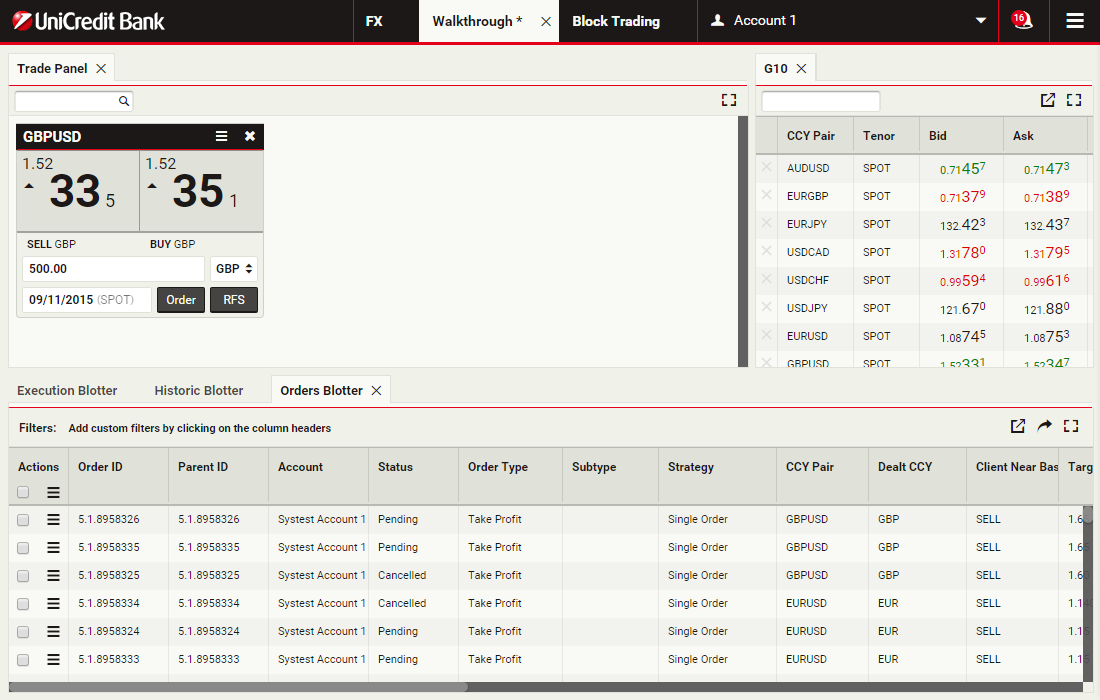
View the blotter entry
You can activate, deactivate, edit and cancel your orders in the Orders Blotter.
Open the menu by clicking its icon
Open the menu by clicking its icon
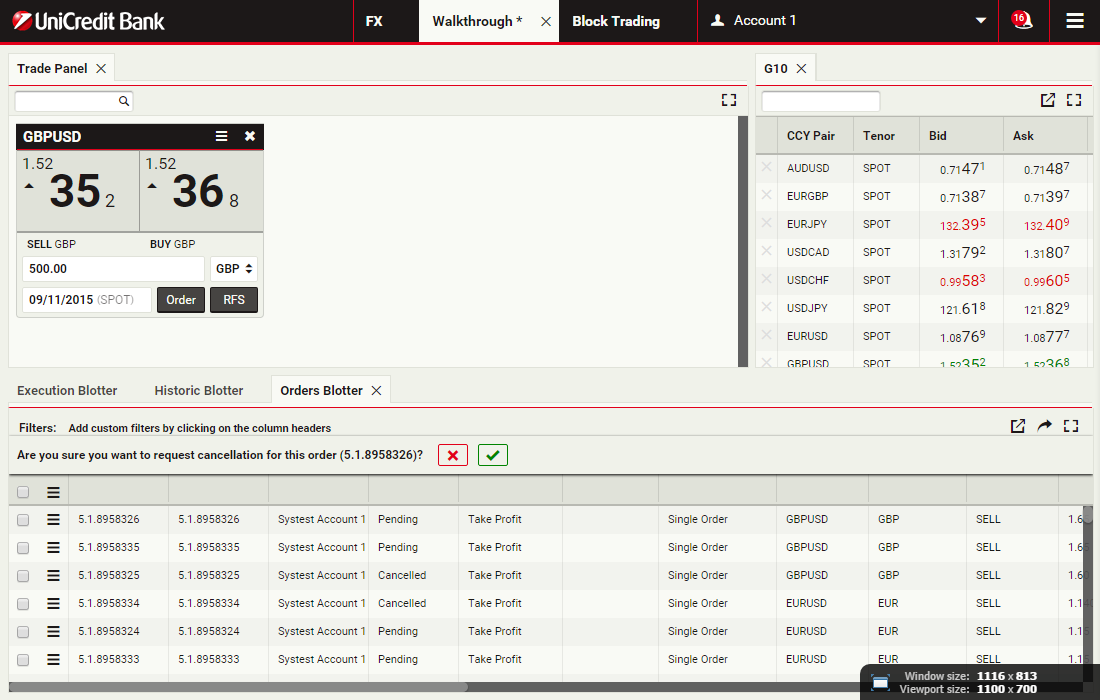
Cancel the order
To cancel the order, choose Cancel from the blotter entry's menu
Confirm cancellation
Click the green tick to confirm the cancellation of the order
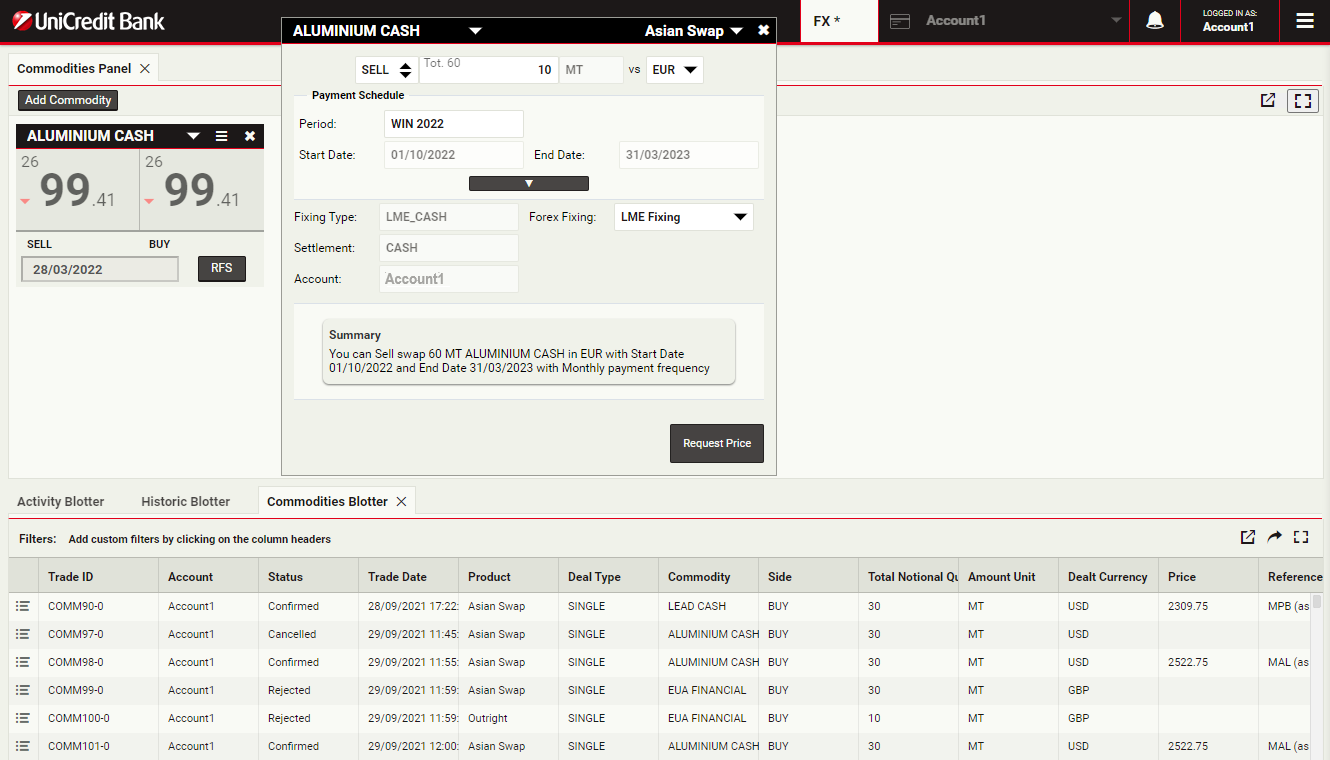
Trading Commodities
UCTrader supports placing commodities orders.
Access to the Orders Module is determined by regional business policy and your individual access privileges. For more information, please see your sales contact.
In this walkthrough, you will use a Alluminuim Cash order ticket to prepare and submit a Asian Swap order to sell 1 million GBP, with a Time-in-Force (TIF) of 1 month after spot.
ContinueAccess to the Orders Module is determined by regional business policy and your individual access privileges. For more information, please see your sales contact.
In this walkthrough, you will use a Alluminuim Cash order ticket to prepare and submit a Asian Swap order to sell 1 million GBP, with a Time-in-Force (TIF) of 1 month after spot.
Launch a new commodity ticket
To launch a swap ticket for Aluminium, click RFS on an Aluminium Cash tile
Select the product type
The product selector allows you to switch between Bullet and Asian Swaps.
Select 'Asian Swap' to continue
Select 'Asian Swap' to continue
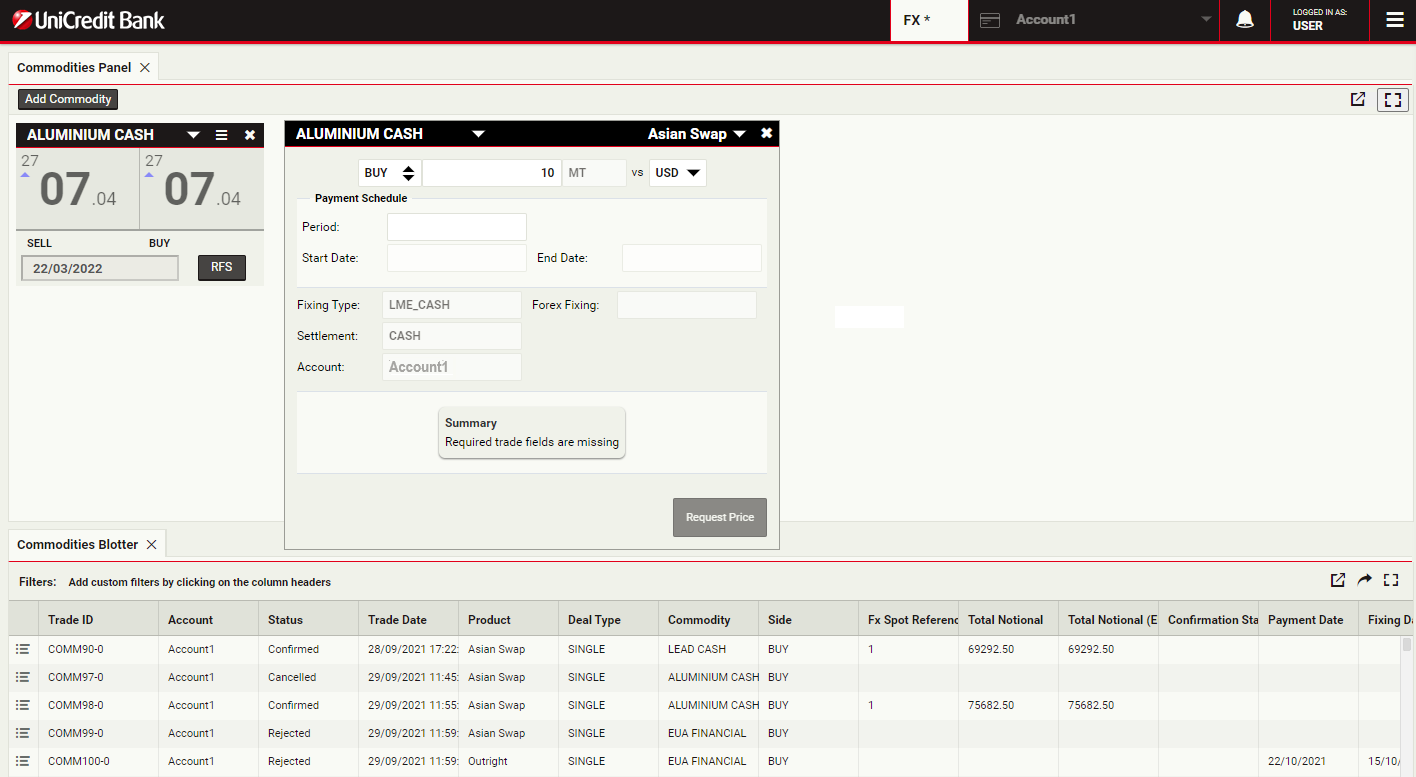
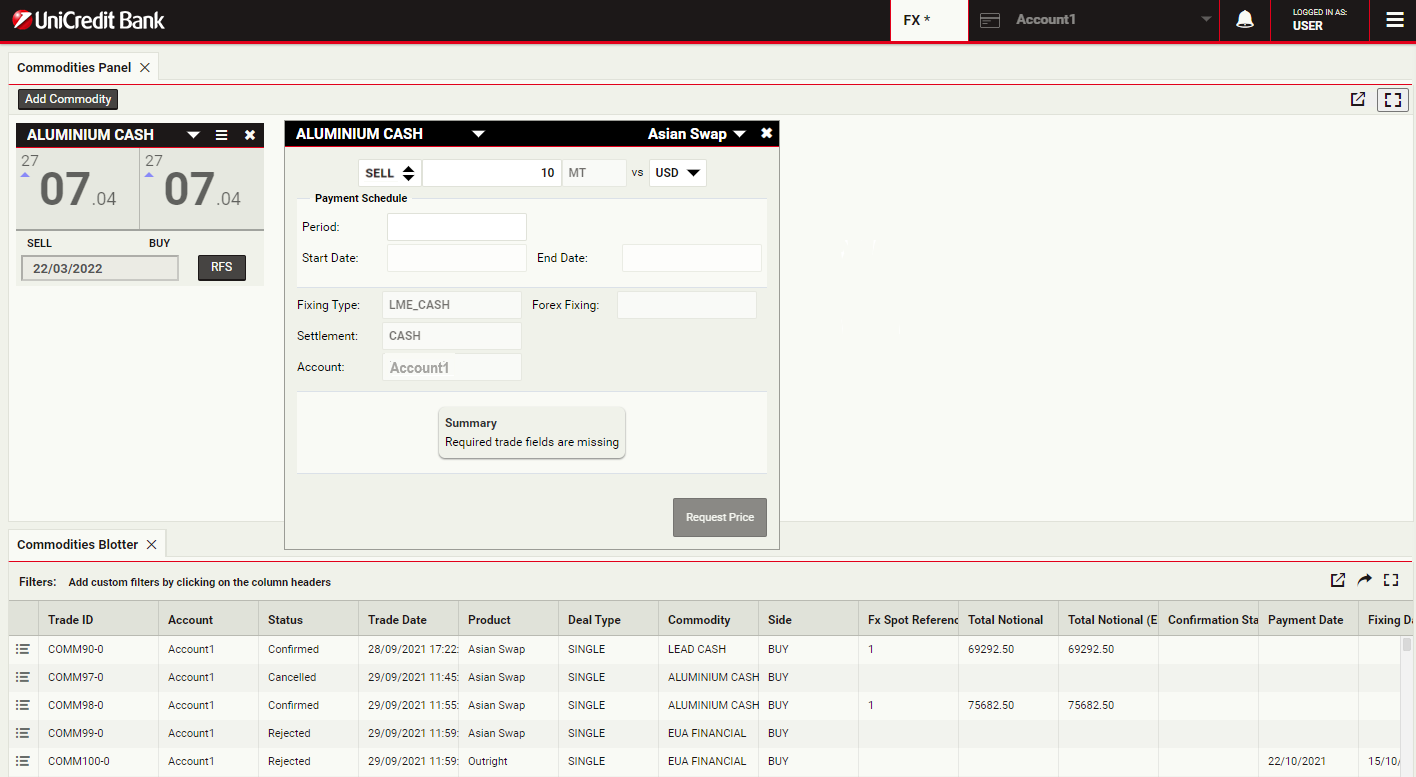
Select trade direction
To change the direction from Buy to Sell, click the direction field
Specify the amount
The amount field accepts numeric input and shorthand units of 'k', 'm', and 'b' for thousand, million and billion respectively.
To specify 10 thousand MT, you can type '10000' or '10k'.
Click the Amount field to continue
To specify 10 thousand MT, you can type '10000' or '10k'.
Click the Amount field to continue
Select the currency
The currency field allows you to specify which currency your selected product will be quoted in.
To change the quoted currency from USD to EUR, select this from the current field
To change the quoted currency from USD to EUR, select this from the current field
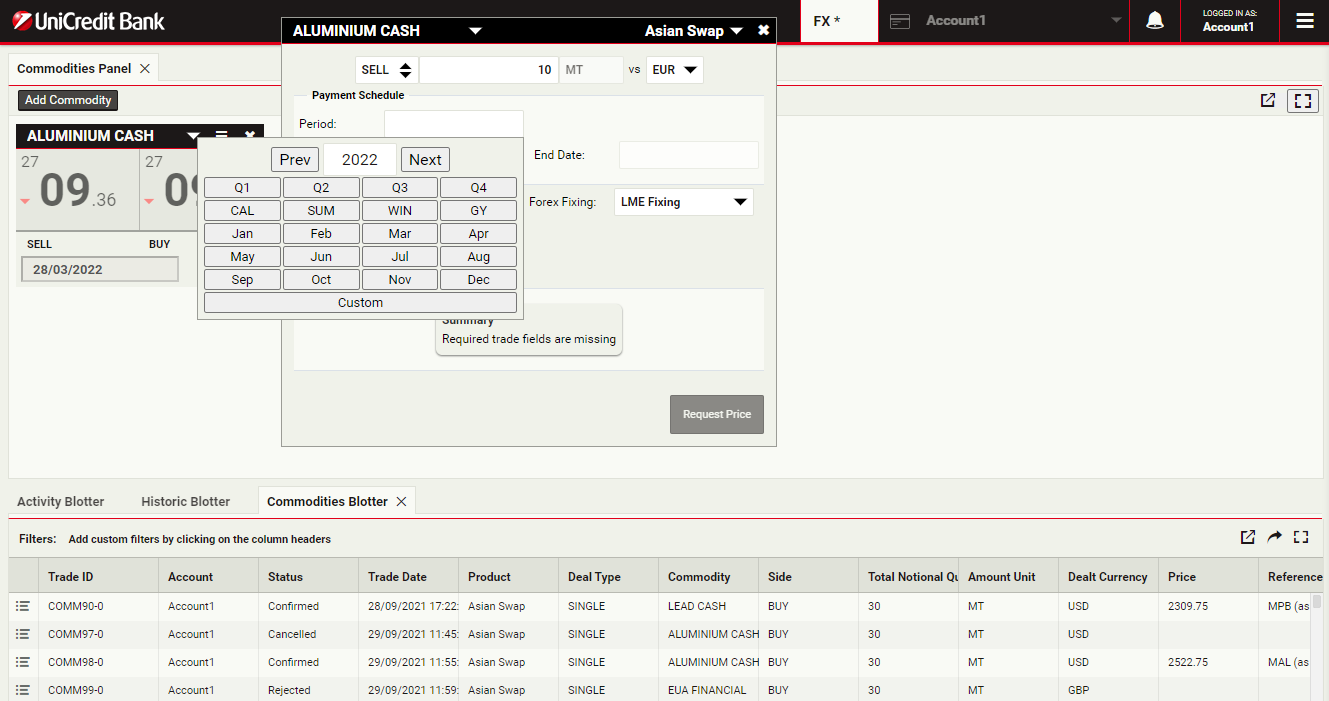
Select the Asian Swap period
The payment schedule tool allows you to select pre-defined quarterly or monthly payment dates for your Asian Swap. Alternatively you can choose a custom period if you wish to enter a bespoke start and end date.
Select "WIN" period to continue
Select "WIN" period to continue
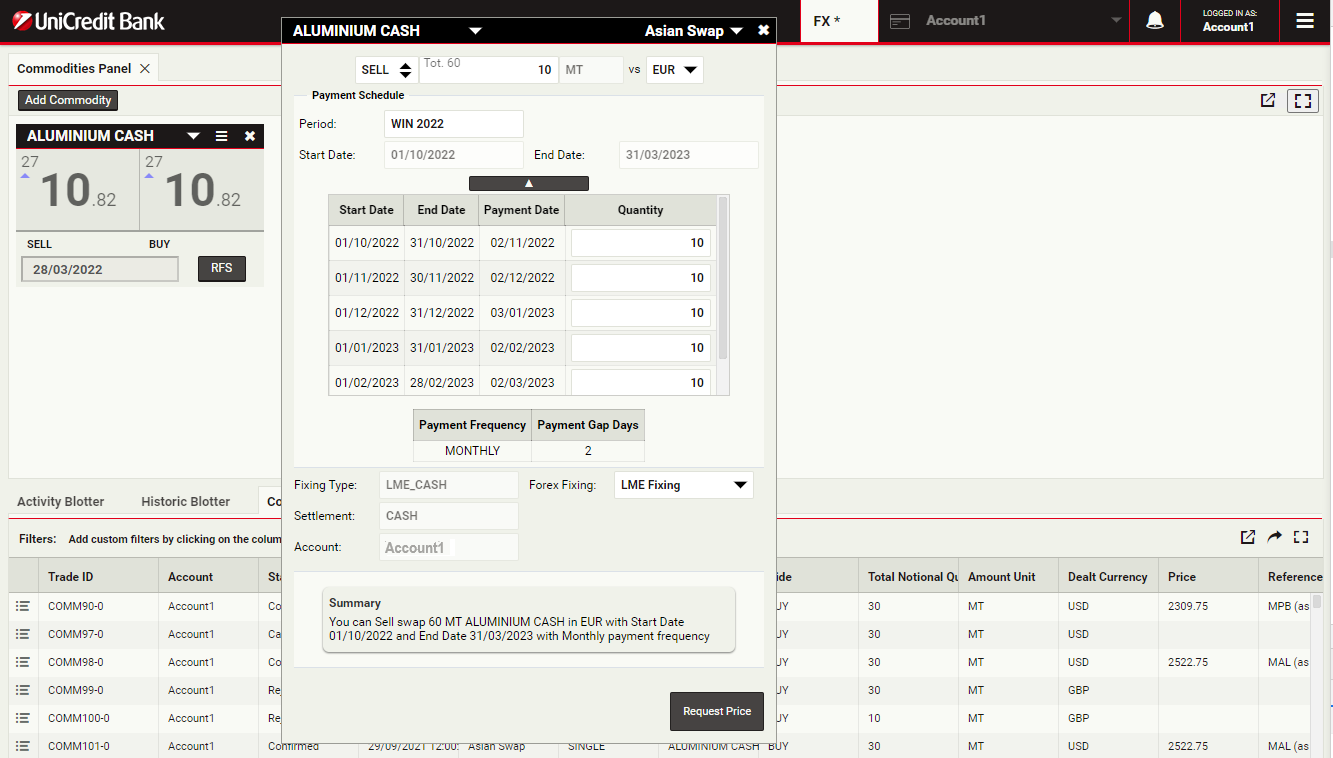
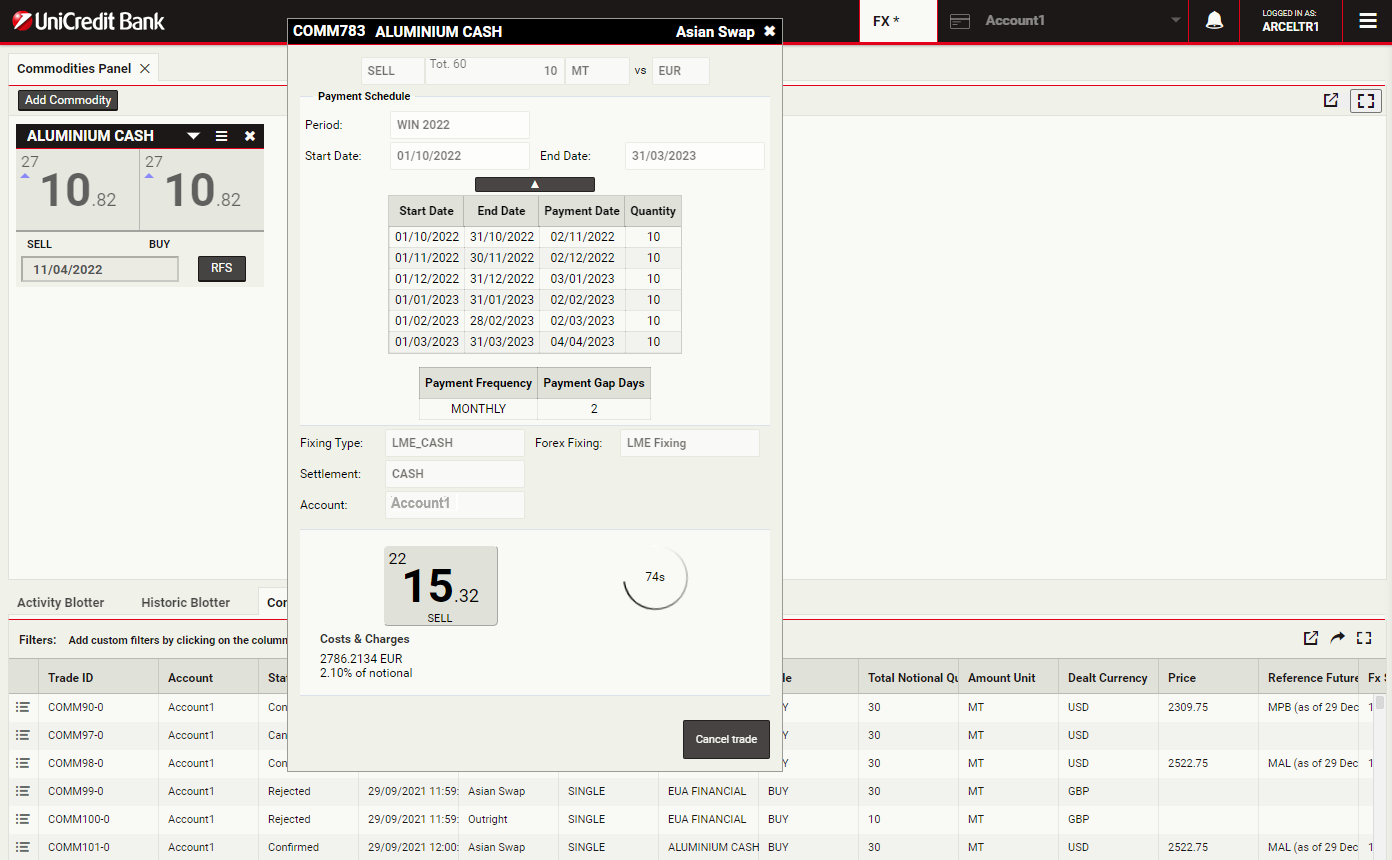
Change cash flow quantity
Once the payment schedule is selected, all dates and payment amounts are automatically populated. If you wish to set a custom payment amount for each date this can also be adjusted.
Change one of the cash flow quantities to 5000 to continue
Change one of the cash flow quantities to 5000 to continue
Select FX Fixing
For non-USD commodities, the Forex Fixing field determines which price source will be used to convert your payments into your chosen currency.
Select "LME Fixing" to continue
Select "LME Fixing" to continue
Get Prices
Click on Request Price to request an executable quote
Execute the trade
The streaming quotes for your selected product are displayed. The stream is only available for a limited time, and a countdown timer displays the remaining time for which the stream is available.
To execute the trade, click on the rate, labelled 'SELL'
To execute the trade, click on the rate, labelled 'SELL'
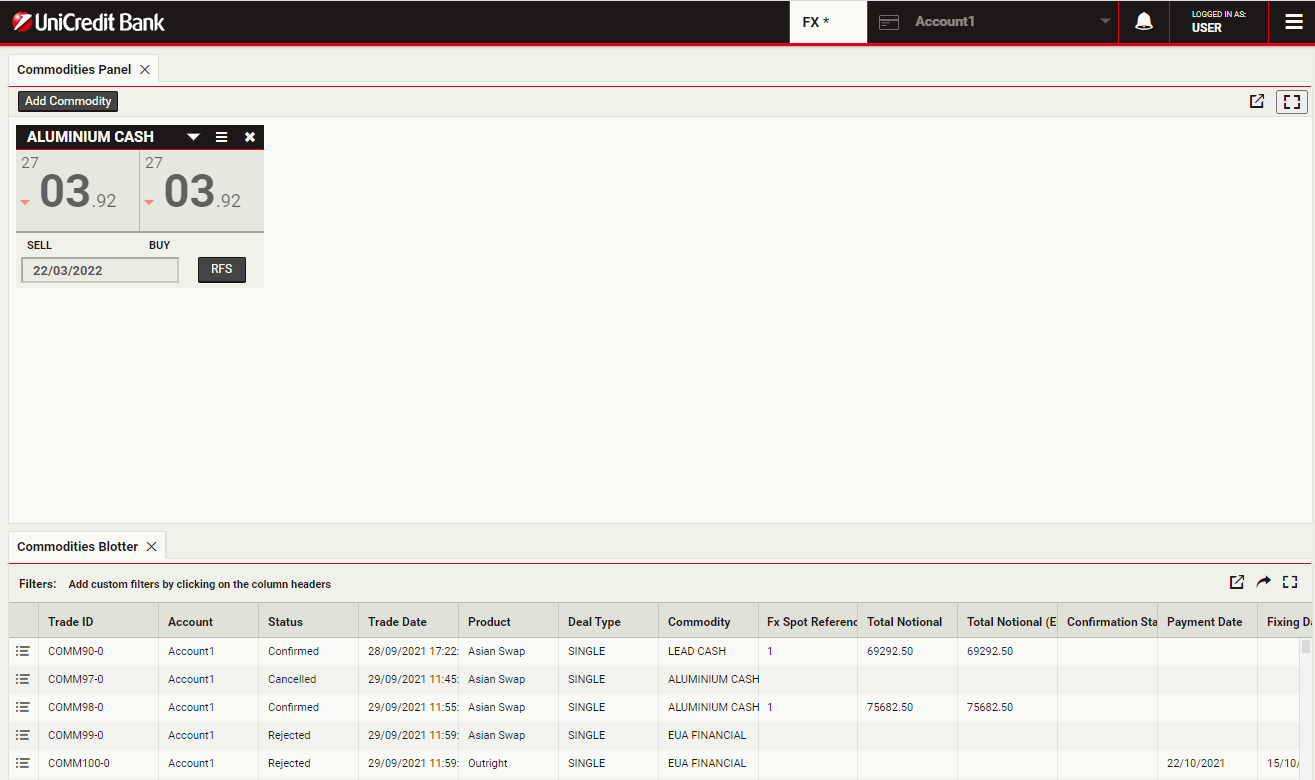
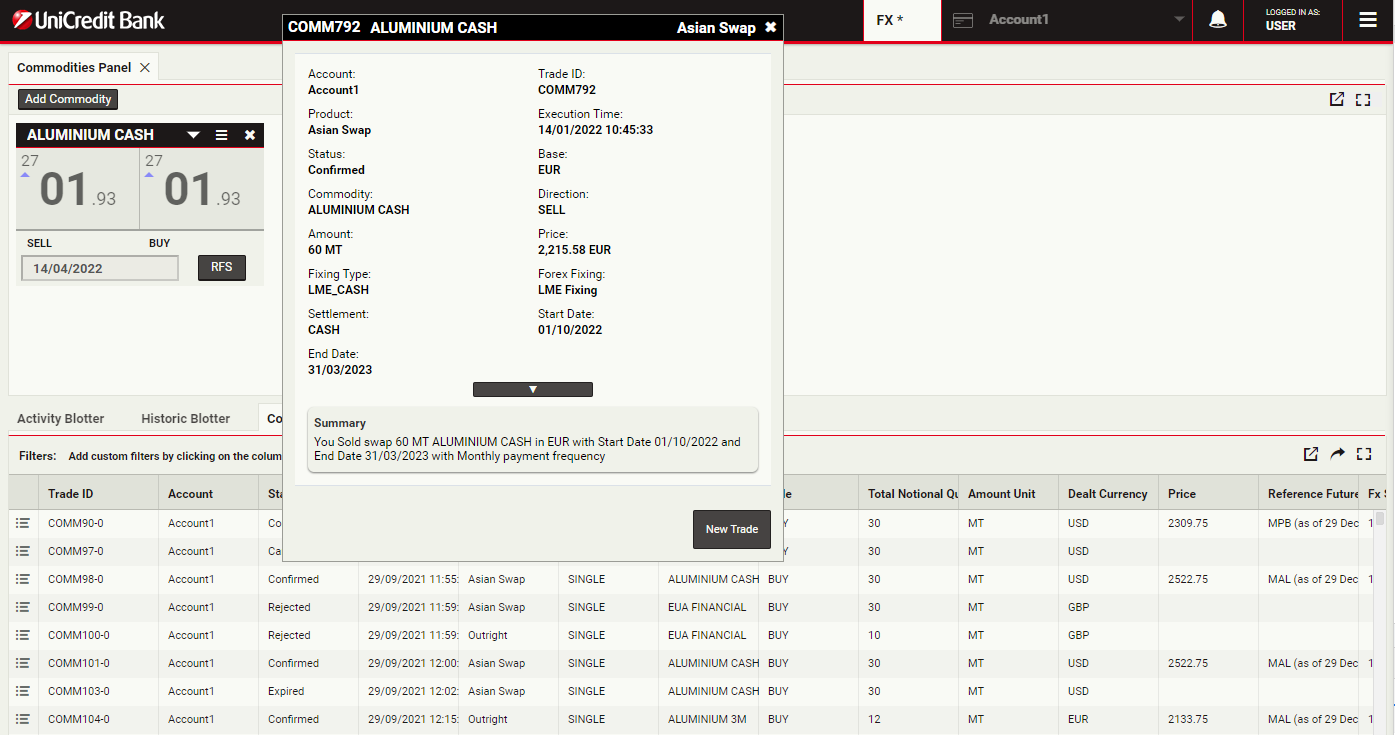
View the blotter entry
You can see the trade in the Commodity Blotter.
To review a confirmation ticket at any time, click the detail icon for the trade's entry in the blotter
To review a confirmation ticket at any time, click the detail icon for the trade's entry in the blotter
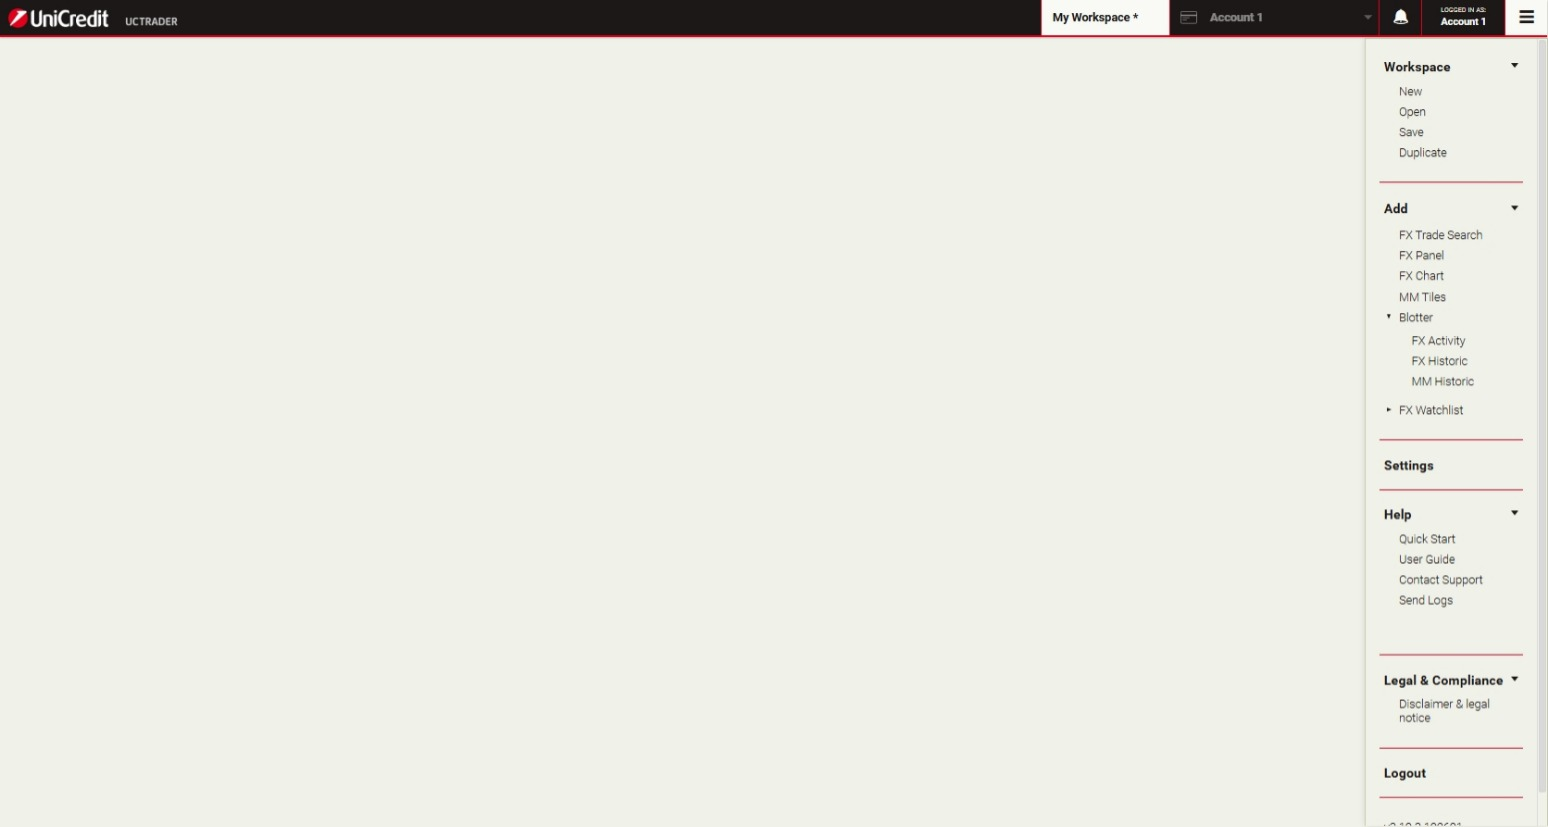
Trading Money Market with tiles
UniCredit is glad to offer Money Markets product via UCTrader platform.This will enable Clients to execute transactions autonomously, in a simple and fast way.Money Market facilitates short-term funding and liquidity management through Deposit instruments with Fixed Rate Interest rate.
ContinueAdd a MM trade panel
To add a Money Market panel, choose Main Menu > Add > MM Tiles
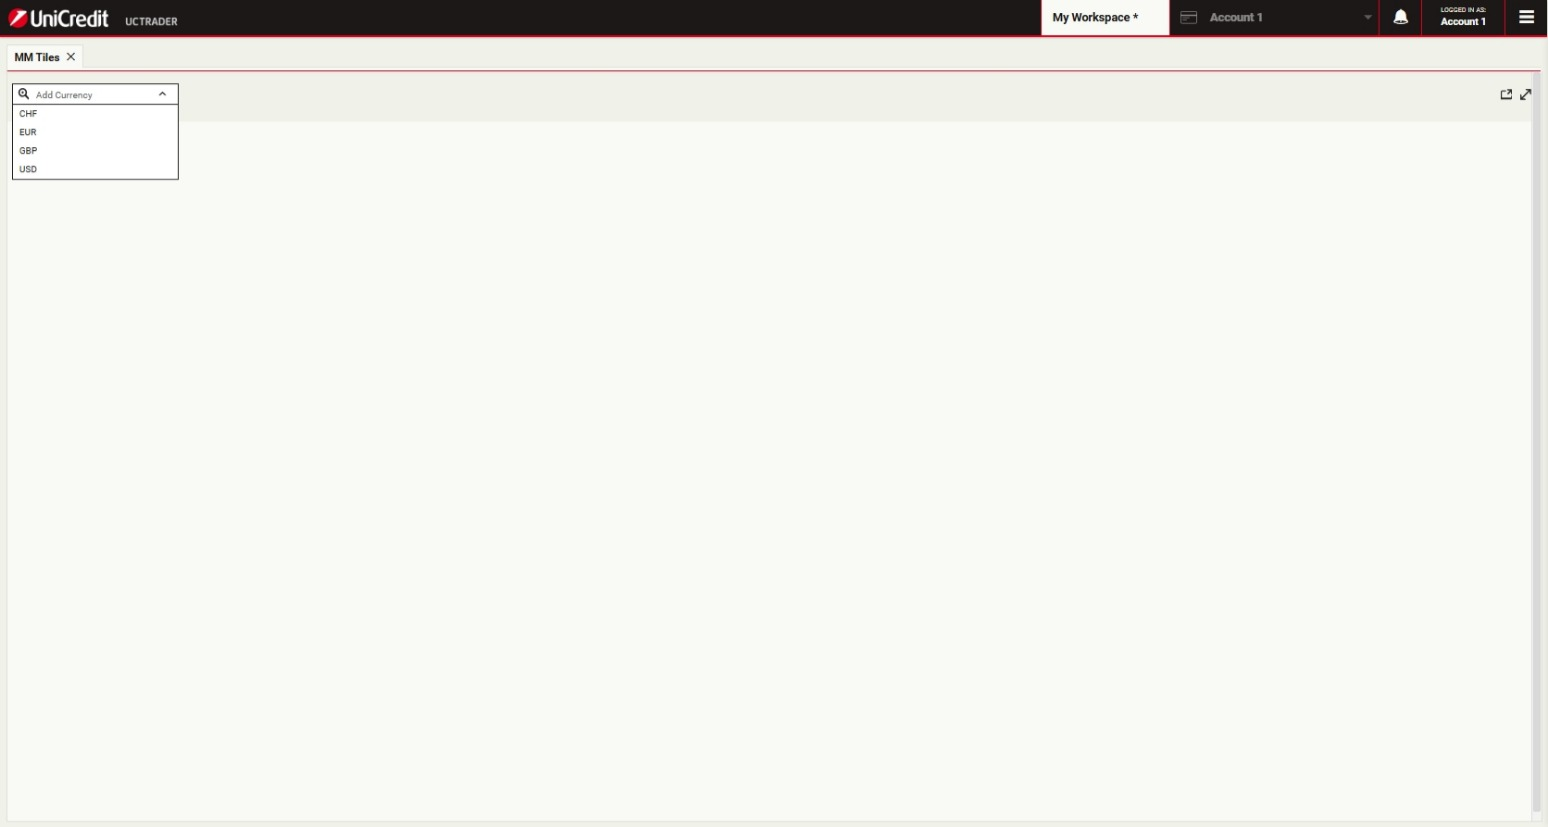
Add a MM Tile
To add a trade tile to the MM Tiles, select a currency pair from the currency-pair picker
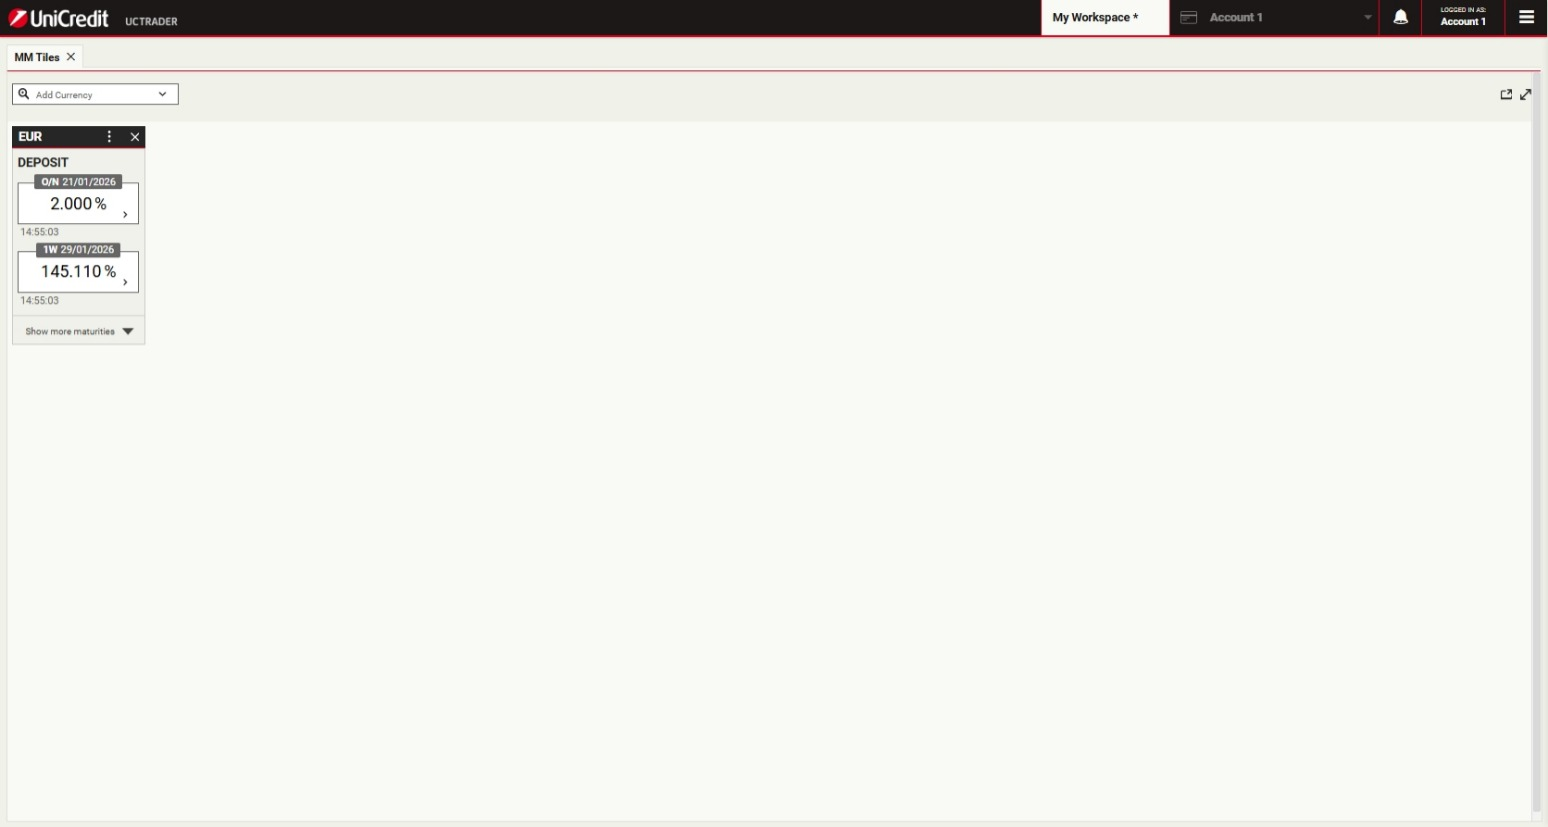
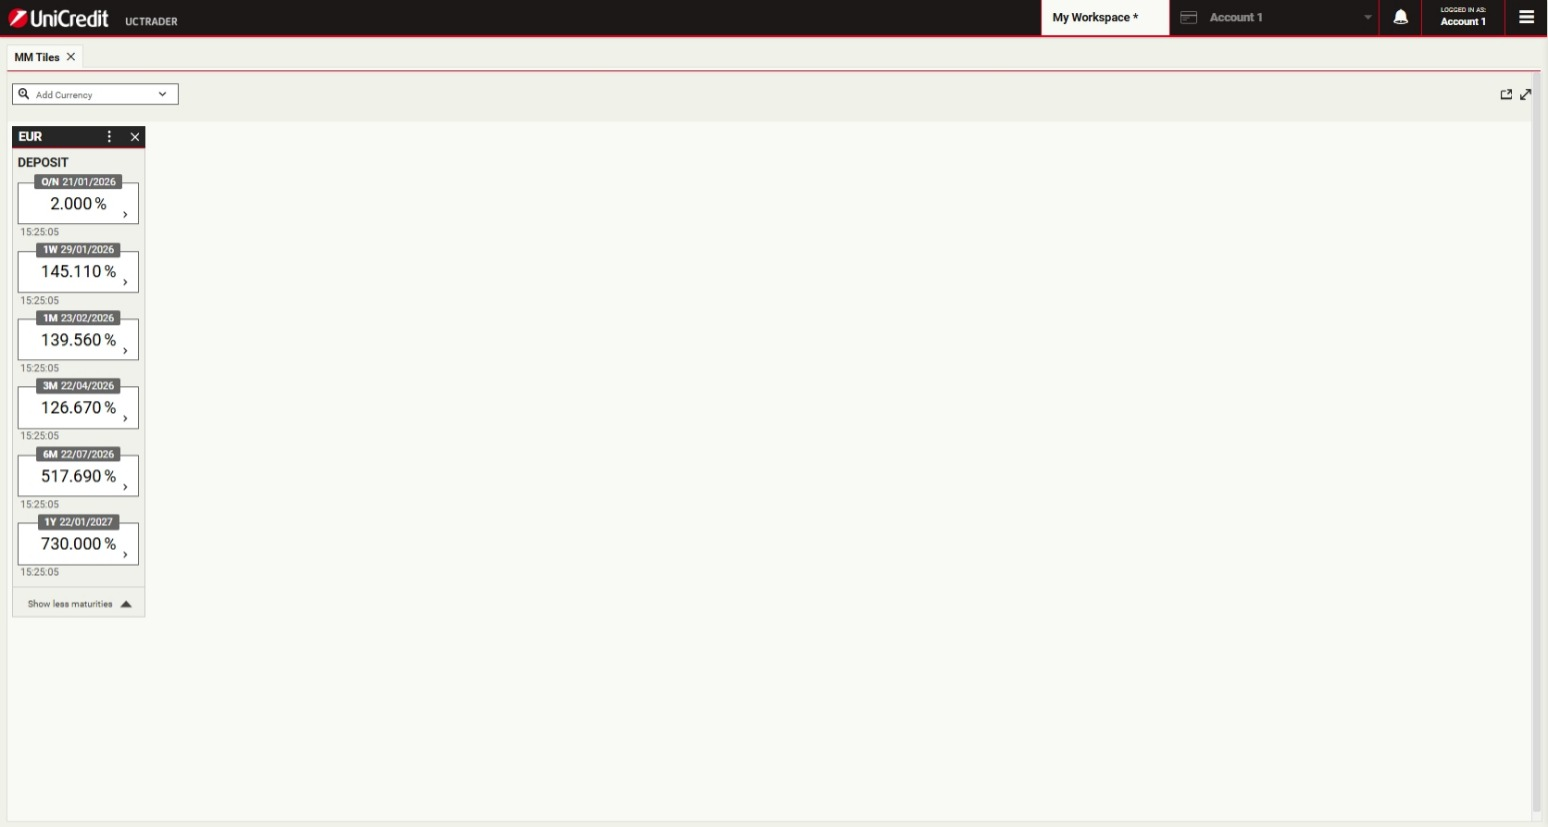
Expand a Tile
To expand the tiles, click on show more maturities
Launch a ticket
To launch a Money Market ticket click on the indicative price for a desired tenor
Specify the currency amount
The Amount field accepts numeric input and shorthand units of 'k', 'm' and 'b' for thousand, million and billion respectively.To specify 1 million, you can type '1000000' or '1m'. Click the Amount field to continue
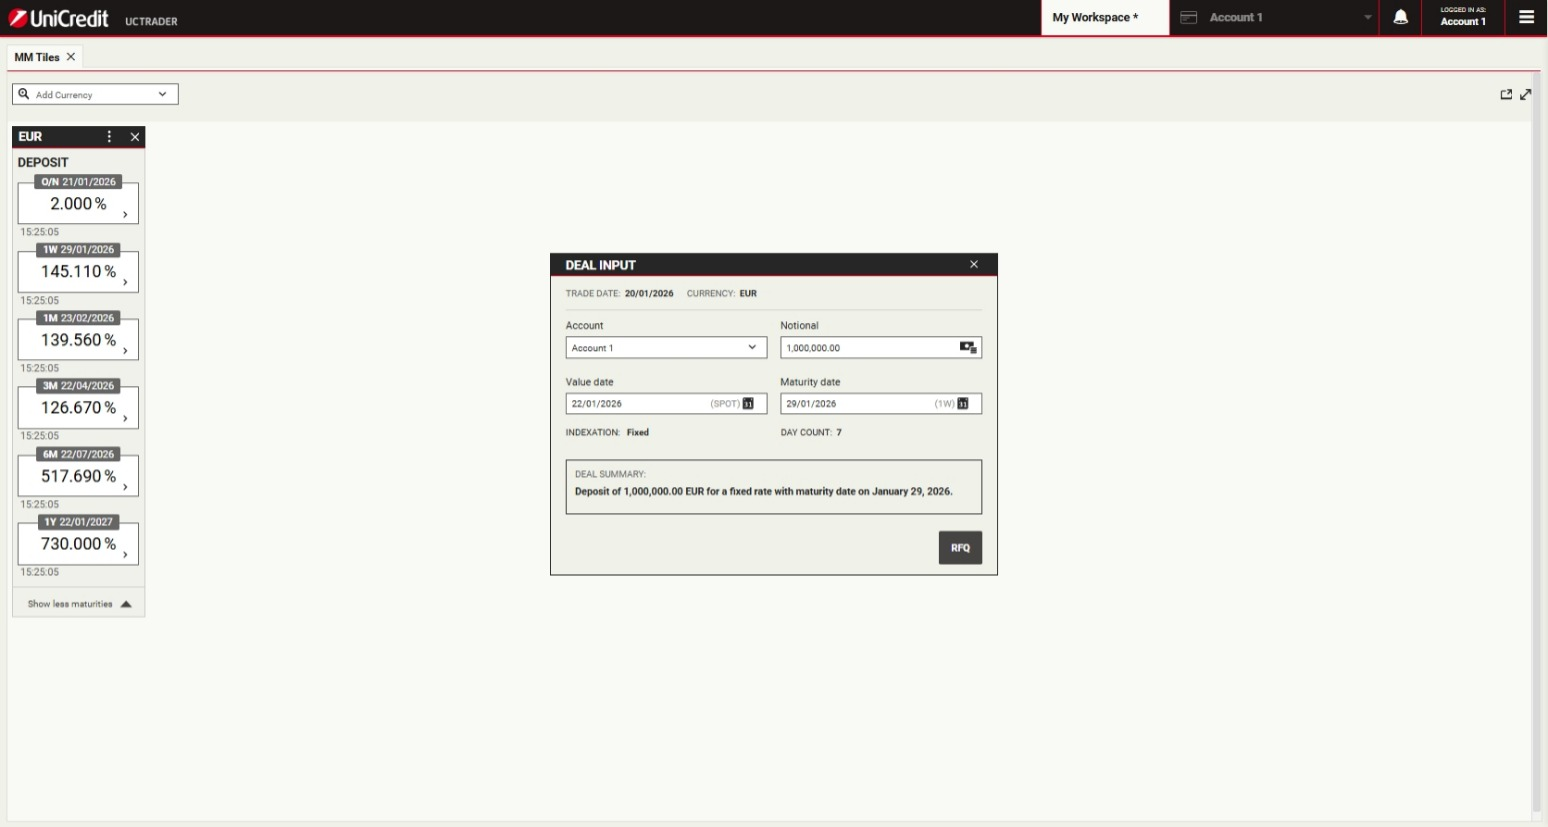
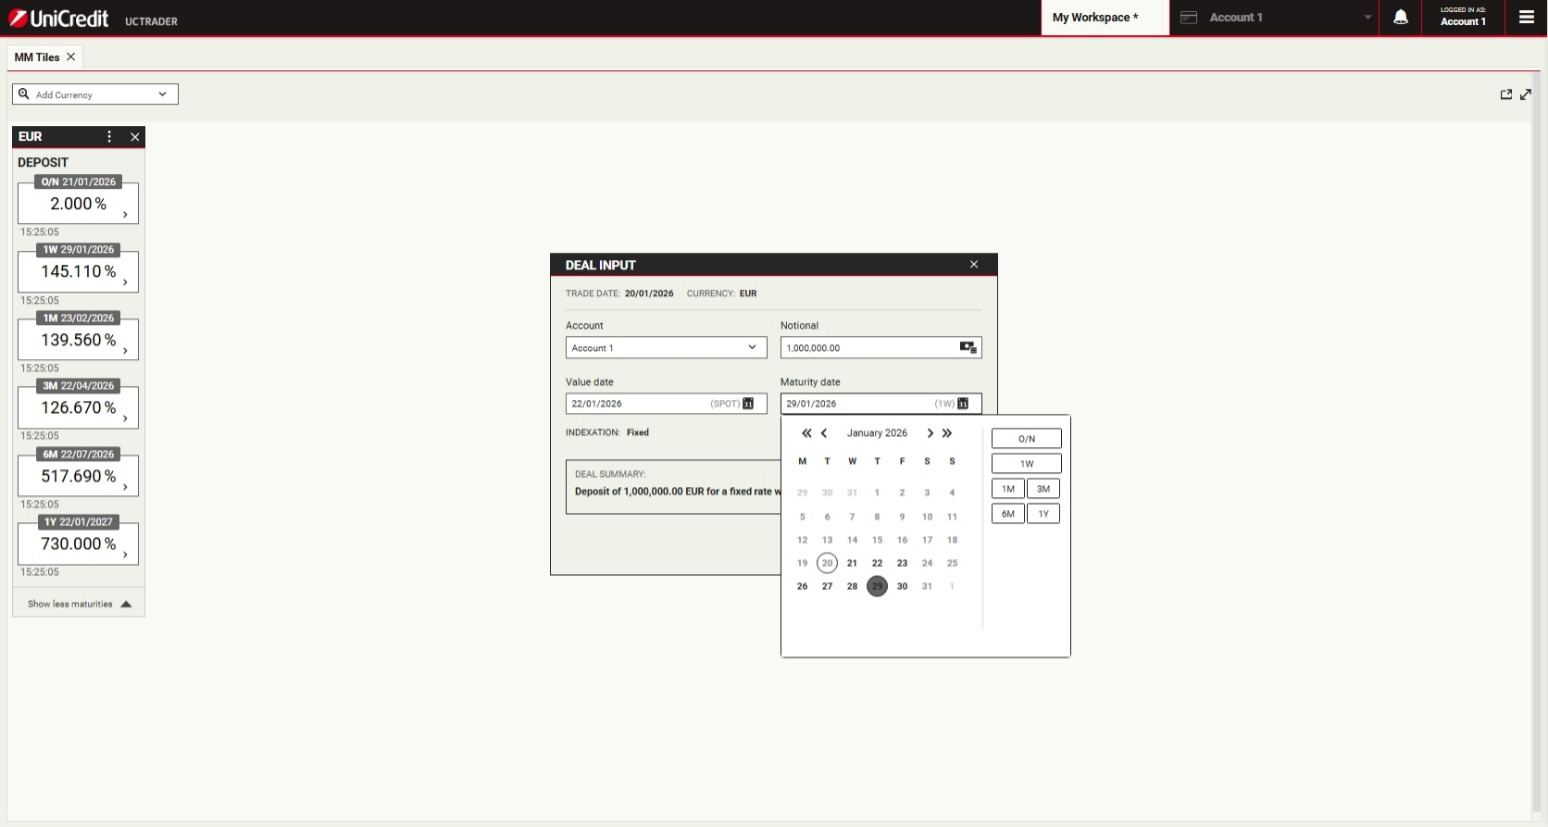
Select a maturity date
Date picker of the Maturity Date field provides a quick way to select tenors and broken dates. To select a value date of 1 week, click the '1W' tenor
Get executable price
Click RFQ to request an executable quote
Execute the trade
Rate and Day count conventions will be displayed in the ticket. The stream is only available for a limited time, and a countdown timer displays the remaining time for which the stream is available. To execute the trade, click the “Book” button.
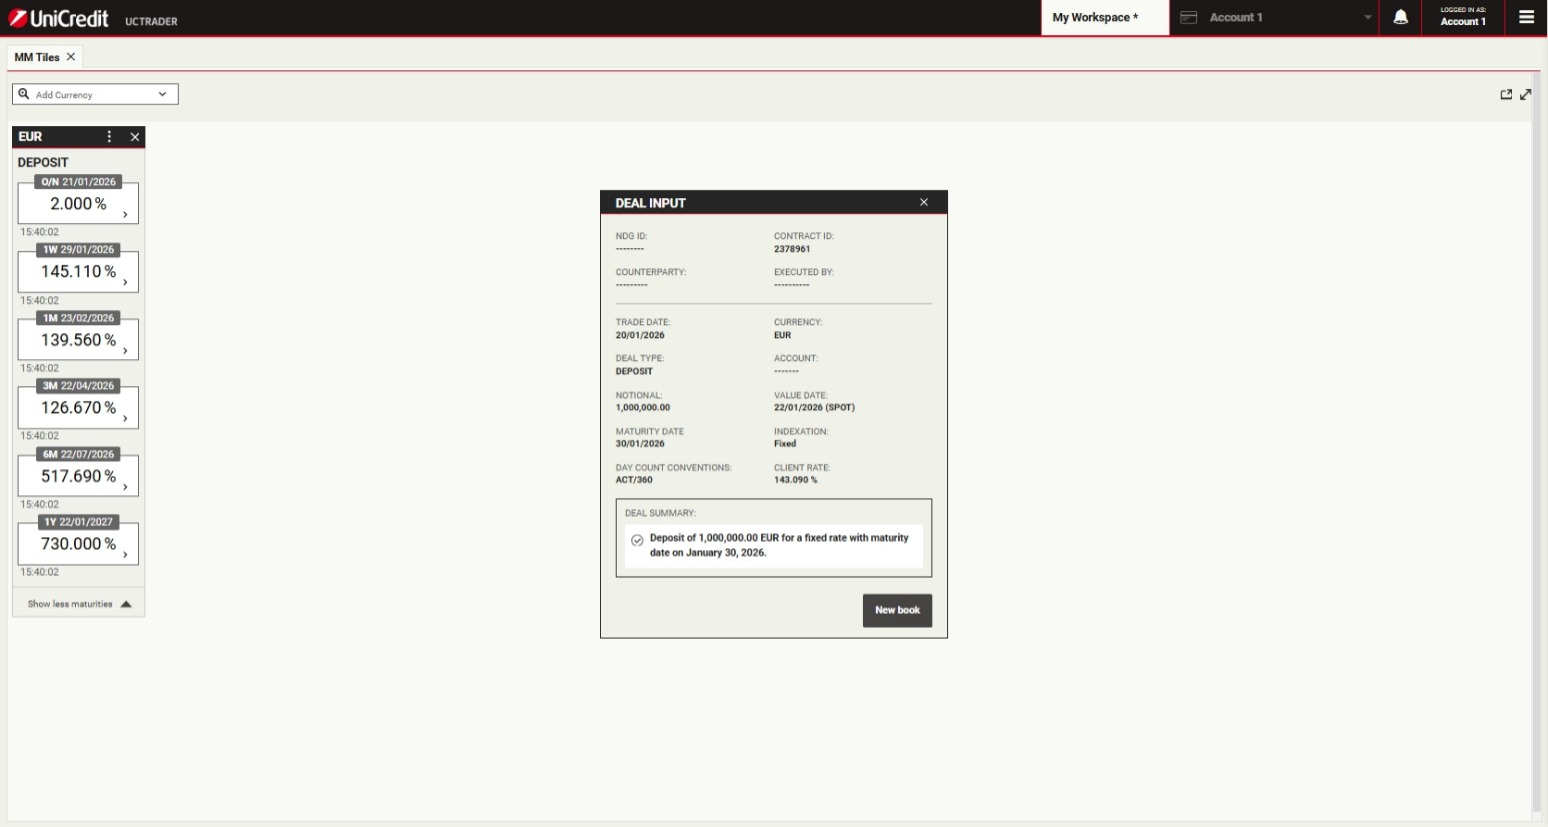
Confirmation ticket
A ticket informs you that the trade was successful. To close the ticket, click the cross in the top-right corner of the ticket
Add a blotter
Blotters show trading activity and allow you to manage orders. Choose Main Menu > Add > Blotter > MM Historic
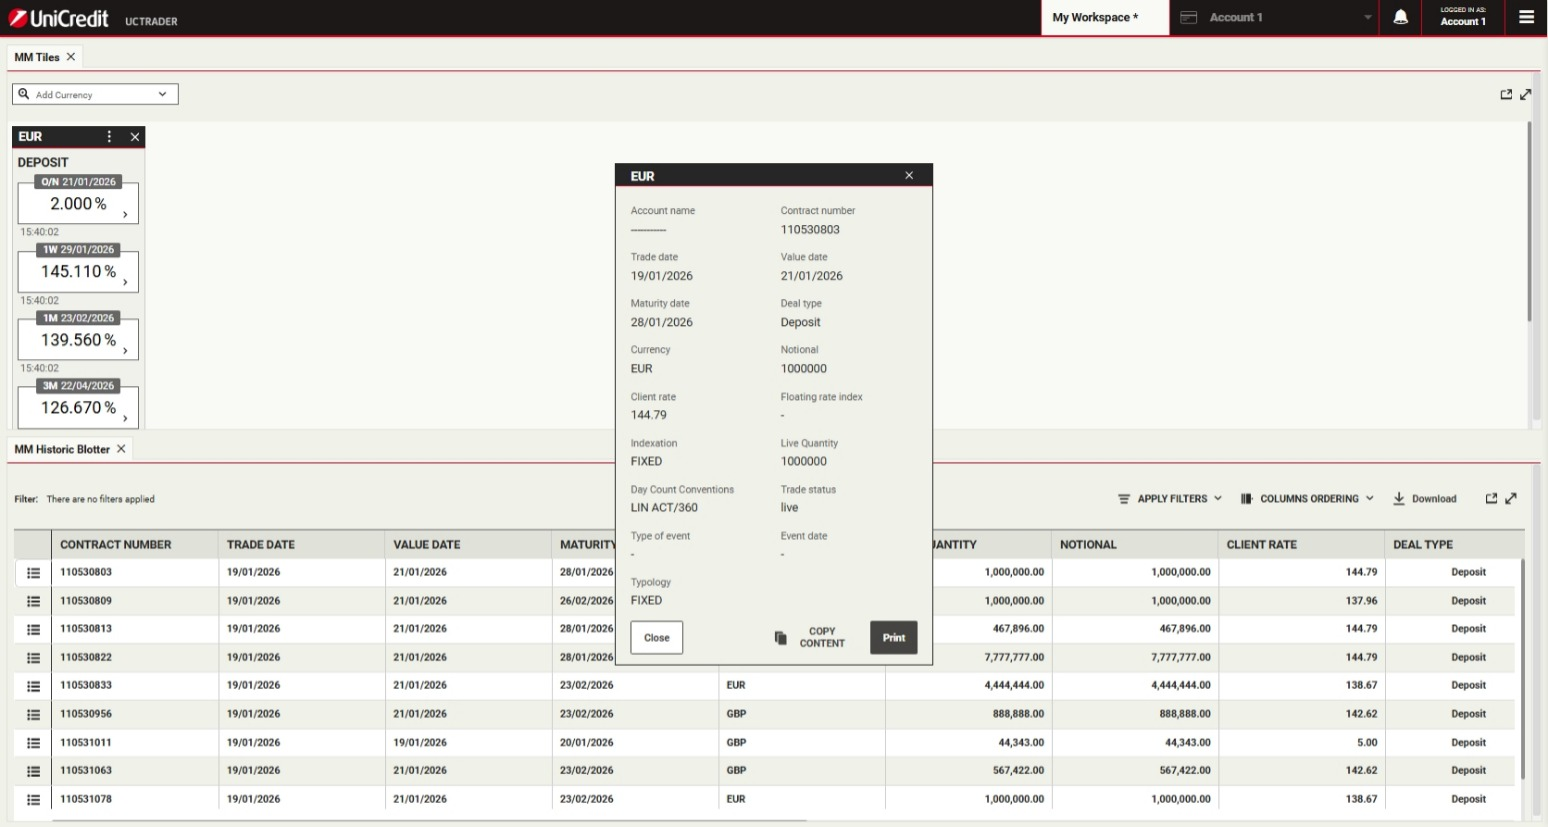
View the blotter entry
You can see the trades in the the Execution Blotter and in the MM Historical Blotter. To review a confirmation ticket at any time, click the detail icon for the trade's entry in the blotter
Close the ticket
To close the ticket, click Close
Accessing detailed help
This is the end of the walkthrough.
For more detailed help, see the User Guide. To access the User Guide from within UCTrader, choose Main Menu > Help > User Guide
RestartFor more detailed help, see the User Guide. To access the User Guide from within UCTrader, choose Main Menu > Help > User Guide